Build a Nesting Box
Interstate Commission on the Potomac River Basin
What is a Nesting Box?
Every year, many birds create their own nests in which to lay their eggs and raise their chicks. Some birds and mammals, however prefer nesting in cavities in decayed trees or stumps and depend on other animals, such as
woodpeckers, or mother nature to create these cavities for them. But human activities such as logging, agriculture, and development have left many species out in the cold. For instance, some of our most enchanting owls — including saw-whet, spotted, screech, barred, boreal, and northern pygmy owls, are having a hard time finding shelter in communities across the country.
A nest box is a man-made nest for cavity-nesting bird species. There are more than two dozen cavity nesting species in the United States. Each nest box is created and placed specifically with the needs and comfort of a different species in mind.
Why Should I Create a Nesting Box?
There’s a serious shortage of accommodations in the bird world these days. It is getting harder for bird species that nest in natural cavities such as holes in decaying trees and stumps to find lodgings. Some species’ populations have declined seriously because of the dwindling number of natural cavities available to them.
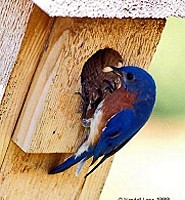
Nesting boxes are a real bonus for birds that raise their young in cavities. Many of these species settle comfortably into human-made dwellings. By creating and placing appropriate nesting boxes we can make a difference in the local population of bird species. An example of a comeback is the eastern bluebird, a species that was in serious decline due to the dwindling number of natural cavities available to them. The species has since rebounded because of nesting box programs organized throughout their range.
Developing Your Goals and Budget
Creating a nest box is not very expensive, however the costs can add up if you are trying to create many of them! Your goals for creating nest boxes will in part determine the costs of their creation.
Goals
You may be building nest boxes just for the members of your organization, or for a local park, or you may be targeting a particular species whose population has dropped precipitously, or you may be reaching out to a specific audience such as schools in your watershed. Whatever the case, you will want to write out your specific goals and let them guide your work plan.
Some example goals:
- Increase the population of a specific bird species that historically nested in your watershed or community
- Enhance community awareness of habitat decline due to increased human activity and presence in the area
- Foster environmental stewardship and an interest in science by students, teachers, administrators, and members of the community
Cost
The cost of creating a nest boxes is quite low. In fact the cost of the tools needed to create a nest box is greater than the cost of a nest box itself. If you are building one bird box, a hand saw, around twenty screws or nails (or wood glue), about ten square feet of 1” thick lumber and a drill with an appropriate sized hole-coring bit will be necessary. If you are building several nest boxes, you will probably want to use a circular saw instead of a hand saw.
The cost of materials for a bird box can vary between under a dollar (scrap lumber and a few screws or nails) to a few dollars (new lumber). The cost of tools could be upwards of $250.00 depending on the tools you decide to purchase.
Financing
There are many ways to finance a bird box project. The simplest method of cost cutting is to cut material costs by using leftover lumber. You can also partner with a lumber yard to get new or scrap lumber donated.
As previously noted, tools are the primary cost of building nest boxes. You can cut these costs by asking members of your organization or friends to lend you their tools for the project. You can also ask your local high school wood shop class if they would be willing to donate their time to help cut lumber to prepare the bird boxes.
If you are in need of funding for your project, you can also ask the recipients of the nest boxes to make a donation or you can seek out grants. The Home Depot and Walmart offer grants for community environmental projects such as these. You might also try the Chesapeake Bay Trust (MD) and the Chesapeake Bay Restoration Fund (VA) or other environmental grant making organizations in your jurisdiction.
Nest Box Project Timeline
Below is a sample timeline for a nest box project where individuals will be building their own boxes and the materials and tools will be provided by your organization:
- Determine the target area for the nest boxes based on species need
- Order materials from supplier
- Arrange for a location to store and build the nest boxes
- Arrange for materials to be delivered or to pick up the materials (NOTE: this may be an additional cost)
- Purchase or arrange to borrow needed tools
- Advertise the nest box construction day through as many outlets as possible
- Create and print steward’s manual/educational materials
- Host nest box construction day
- Arrange site visits to make sure that the nest boxes are properly installed and/or to help install them
- Call nest box stewards to remind them to clean out their nest boxes after the nesting season
Advertising your Nest Box Project
There are lots of ways to advertise for an event and, unfortunately, no one way works consistently. Here are several options for you to choose from. The best outreach campaigns make use of several techniques and only you can know what is best for your project. Advertising options include:
- Creating and distributing door hangers to target a specific neighborhood where you would like to work
- Creating and distributing a press release to your local paper, radio stations and/or television stations (see the Resources section for information on how to write and distribute a press release).
- Creating flyers and placing them in public libraries, recreation centers, outdoor stores, and walking trails
- Developing a web site and using social media such as Facebook and Twitter
- Running an advertisement in a local paper, or on radio stations and/or television stations
- Discussing the event at a targeted community association, church group, youth group, and/or service organization meeting
- Advertising your event on free on-line environmental calendars such as the Chesapeake Network
- Sending out an email to people you think would be interested and asking them to tell their friends as well
- Sending out a mass mailing to your targeted audience
Organizing a Nest Box Construction and/or Distribution Day
It is not enough to have the construction materials for your nest boxes ready for your event—some final preparations need to be made to make your construction/distribution day a success.
Construction
In advance of your event make sure that you have:
- Enough tools to share among participants without creating long waits
- Refreshments and snacks if possible or at least provide water
- Created and printed a sign-in sheet
- Created and printed enough directions for constructing the nest boxes if possible with diagrams
- Created a pre-constructed nest box for demonstration purposes
- Done as much prep work for each nest box as is possible—for example, put all the parts together with each nest box or pre-cut the wood for the box
- Called key volunteers and asked them to arrive early and be Team Leaders
- Organized stations or groups so that volunteers can be teamed up with Team Leaders to assemble their nest boxes
- Put together an emergency medical kit and set up an emergency plan in case of an accident
- Made sure that bathroom facilities are available for volunteers
- Contacted local newspapers
- Designated a volunteer to take photos of the event
Distribution
It is not enough to give out the completed nest boxes and assume that they have been installed correctly. In advance of your event make sure to:
- Create or set aside a nest box to demonstrate proper installation
- Find the proper habitat near your distribution site where you can demonstrate installation
- Prepare the installation site so that the demonstration will go quickly and smoothly
- Create and print instructions for installing the nest box if possible with diagrams
- Recruit volunteers to visit homes to help install the nest boxes and/or to make sure that nest boxes are properly installed
Creating a Nesting Box
There are several steps to constructing a nest box from scratch. Ideally, the first three steps below would be completed before the volunteers assemble the nest boxes in order to save time and to minimize the number of people using potentially dangerous tools.
Materials
Of all the available building materials, wood is about as good as you can get. It’s durable, has good insulating qualities, and it breathes. Three-quarter to one-inch-thick bald-cypress and red cedar are recommended. You can  use any wood that resists weathering. Pine and exterior grade plywood will do, but they’re not as durable. Softwoods, particularly pines, are easy to work with. Avoid hard-woods, poplar, and basswood as they weather poorly. It makes no difference whether the wood is slab, rough-cut or finished, as long as the inside has not been treated with stains or preservatives. Fumes from the chemicals could harm the birds.
There’s no need to paint cypress and cedar, but pine and plywood houses will last longer with a coat of water based exterior latex paint. White is the color for purple martin houses. Tan, gray, or dull green works best for the other cavity nesting species. The dull, light colors reflect heat and are less conspicuous to predators. Don’t paint the inside of the box or the entrance hole. Regardless of which wood you select, gluing all the joints before you screw them together will extend the life of your bird house. Galvanized or brass hinges and screws resist rusting and hold boxes together more tightly as they age.
Tools
- Hand saw or circular saw
- Hand Drill
- Screwdriver or screwdriver drill bit
- Hole coring drill bits (size will vary depending on the next boxes intended species)
Design
How elaborate you make your bird house depends on your personal sense of aesthetics. For the most part, all the birds care about is their safety and the right dimensions: box height, depth and floor, diameter of entrance hole, and height of hole above the box floor. Refer to the following chart, keeping in mind that birds make their own choices, without regard for charts. So don’t be surprised when you find tenants you never expected in a house you intended for someone else. Here is an example of an Eastern Bluebird box design (as seen on this page).
Nest Box Dimensions
| Species | Box Floor (in.) | Box Height (in.) | Entrance Height (in.) | Entrance Diameter (in.) | Placement Height (ft.) |
| American Robin* | 7×8 | 8 | — | — | 6-15 |
| Eastern Bluebird | 5×5 | 8-12 | 6-10 | 1-1/2 | 4-6 |
| Western & Mountain Bluebird |
5×5 | 8-12 | 6-10 | 1-9/16 | 4-6 |
| Chickadees | 4×4 | 8-10 | 6-8 | 1-1/8 | 4-15 |
| Titmice | 4×4 | 10-12 | 6-10 | 1-1/4 | 5-15 |
| Ash-throated Flycatcher | 6×6 | 8-12 | 6-10 | 1-1/2 | 5-15 |
| Great Crested Flycatcher | 6×6 | 8-12 | 6-10 | 1-3/4 | 5-15 |
| Phoebes* | 6×6 | 6 | — | — | 8-12 |
| Brown-headed Pygmy and Red-breasted Nuthatch |
4×4 | 8-10 | 6-8 | 1-1/4 | 5-15 |
| White- breasted Nuthatch | 4×4 | 8-10 | 6-8 | 1-3/8 | 5-15 |
| Prothonotary Warbler | 5×5 | 6 | 4-5 | 1-1/8 | 4-8 |
| Barn Swallow* | 6×6 | 6 | — | — | 8-12 |
| Purple Martin | 6×6 | 6 | 1-2 | 2-1/4 | 6-20 |
| Tree and Violet-Green Swallows |
5×5 | 6-8 | 4-6 | 1-1/2 | 5-15 |
| Downy Woodpecker | 4×4 | 8-10 | 6-8 | 1-1/4 | 5-15 |
| Hairy Woodpecker | 6×6 | 12-15 | 9-12 | 1-1/2 | 8-20 |
| Lewis’s Woodpecker | 7×7 | 16-18 | 14-16 | 2-1/2 | 12-20 |
| Northern Flicker | 7×7 | 16-18 | 14-16 | 2-1/2 | 6-20 |
| Pileated Woodpecker | 8×8 | 16-24 | 12-20 | 3×4 | 15-25 |
| Red-Headed Woodpecker | 6×6 | 12-15 | 9-12 | 2 | 10-20 |
| Yellow- bellied Sapsucker | 5×5 | 12-15 | 9-12 | 1-1/2 | 10-20 |
| Bewick’s and House wrens | 4×4 | 6-8 | 4-6 | 1-1/4 | 5-10 |
| Barn Owls | 4×4 | 6-8 | 4-6 | 1-1/2 | 5-10 |
| Screech Owls and Kestrel | 8×8 | 12-15 | 9-12 | 3 | 10-30 |
| Wood Ducks | 10×18 | 10-24 | 12-16 | 4 | 10-20 |
| Red-tailed Hawk and Great Horned Owl |
24×24 platform | ||||
| Osprey | 48×48 platform | ||||
*Use nesting shelf, platform with three sides and an open front
Step 1 – Mark and Cut the nest box floor and sides.
- Using a piece of cardboard or paper as a template for size, mark the wood with the dimensions for the nest box you are building
- Using a hand saw or a circular saw, cut the wood where marked
Step 2 – Mark and Cut the Entrance Hole
- Using a template for size, mark the wood with a hole appropriate for the species of bird you are trying to attract. Make sure that the nest hole is located in the appropriate place
- Depending on the type of species you are attracting, you can use a drill bit to drill the exact size hole. If you are building a box for a species that needs a large or unusual shaped hole, pre-drill a small hole using ½” spade
 bit. This hole is the starting point of your jigsaw to cut the large hole
 - Use the jigsaw to cut out your hole
 bit. This hole is the starting point of your jigsaw to cut the large hole
Step 3 – Mark and Drill Drain Holes
- Mark four or five spots on the base of the nest box to drill drain holes. If you are doing four holes, place them about an inch from each corner. If you add a fifth hole, place it in the center of the base.
- Using a quarter inch drill bit, drill holes in the locations that you marked.
Step 4 – Screw or nail together the box
- Use a wood glue to place together the boxes panels (except the hinged top or side entrance)
- While the wood glue is drying, nail or screw together the panels so that the sides make a tight fit
- Attach the hinged panel with screws or nails
Step 5 – Paint or stain your box (if necessary)
- If you paint your box, use subdued brown, tan, or gray, as birds are more likely to be attracted to these colors
- Do not paint or stain the inside of your box!
Additional Suggestions for Creating your Nest Box
Drainage
- Water becomes a problem when it sits in the bottom of a bird house. A roof with sufficient slope and overhang offers some protection. Drilling the entrance hole on an upward slant may also help keep the water out
- Regardless of design, driving rain will get in through the entrance hole. You can assure proper drainage by cutting away the corners of the box floor and by drilling 1/4 inch holes in the box floor. Nest boxes will last longer if the floors are recessed about 1/4 inch
 if the floors are recessed about 1/4 inch
Entrance Hole and Interior
- Make the surface of your entrance hole rough. A rough surface both inside and out makes it easier for the adults to get into the box and, when it’s time, for the nestlings to climb out. If your box is made of finished wood, add a couple of grooves outside below the hole
- Add grooves, cleats or wire mesh inside the front panel
Other Thoughts
- Create a hinged roof or side panel on the box so that you can clean out the nest box at the end of the nesting season
- Don’t attach a platform or perch outside the box! Perches give predators an easy way to raid the nest
- Without air vents, boxes can turn into bird ovens. There are two ways to provide ventilation: leave gaps between the roof and sides of the box, or drill 1/4″ holes just below the roof
- Don’t be tempted by those beautiful duplexes or houses that have more than one entrance hole. With the exception of purple martins, cavity-nesting birds prefer not to share a house. While these condos look great in your yard, starlings and house sparrows are the only birds inclined to use them
Installing Your Nest Box
The installation process is just as important as the construction process. A nest box can be solidly constructed, but it will not attract the bird species that you desire if it is not properly located and installed. In fact, an improperly placed box may attract undesirable species and may actually help drive away the birds you are trying to attract.
Where you put your bird house is as important as its design and construction. Cavity nesting birds are very particular about where they live. No matter how perfect your nest box, if you don’t have the right habitat, the bird s aren’t likely to find it. Not everyone has the habitat for a wood duck, purple martin, or screech owl. On the other hand, just about anyone can attract a robin, titmouse, wren, or chickadee.
Let’s assume you’ve built or bought the “perfect” house. You put it out in your backyard in February. Months pass, and not one bird has landed on it. What’s wrong? It may be that you don’t have the right habitat, or it may be where you put the house. There’s lots you can do to modify your land to attract the birds you want to see. It can be as simple as putting out a bird bath or as complicated as planting fruit-bearing shrubs or installing a pond with a waterfall. But it’s much easier just to identify the birds most likely to take to your backyard as it is and put the appropriate nest box in the right place.
Should you hang it from a tree limb, nail it to a fence, or mount it on a pole or a tree trunk? There’s a wide range between how high and low you can place a nest box. Pick a height that’s convenient for you. After all, you’ll want to watch what goes on and keep the box clean. If you want to watch chickadees from your second floor window or deck, fifteen feet is not unreasonable but it’s a lot easier to clean out a box at eye level.
Here are some tips on where to put bird houses:
- Houses mounted on metal poles are less vulnerable to predators than houses nailed to tree trunks or hung from tree limbs.
- Use no more than four small nest boxes for any one species or one large box per acre.
- Put about 100 yards between bluebird boxes and 75 yards between swallow boxes (if you have both species, “pair” the houses with one bluebird box 25 feet from a swallow box. Put the “pair” 100 yards away.)
- Don’t put bird houses near bird feeders.
- Don’t put more than one box in a tree, unless the tree is extremely large or the boxes are for different species.
- If you have very hot summers, face the entrance holes of your boxes north or east to avoid overheating the box.
- Cover the entrance until it’s nesting time for the birds you hope to attract. Starlings and sparrows nest early and frequently take over boxes intended for other birds. They are also partly responsible for the decline of many cavity-nesting birds.
- Don’t put nesting materials inside the box — birds would much rather find their own. But you can help out by making materials available outside.
- The box will more likely be used if it’s placed on a pole, mounted on a tree-trunk, or suspended from a branch with a hook screwed into the roof.
- Pick a spot that’s sunny at least part of the day. Turn the entrance away from the usual direction of wind and rain — birds don’t want a storm in their living-room!
Maintaining Your Nest Box
Maintaining a nest box is easy! The most important thing to remember to keep your nest box in good shape is to empty the nest box at the end of the nesting season. Cleaning the box thoroughly gets
rid of parasites that can actually weaken and kill nestlings. It’s a good idea to wear a face mask (available at hardware stores) to avoid breathing fungi and parasites. Scrub your box with a stiff brush and pour boiling water through it for disinfecting purposes.
For species like bluebirds, which sometimes nest twice in a summer, remember to houseclean between broods. Removing the first nest keeps adults from building another one on top of it. Otherwise, the new nest could be raised dangerously close to the entrance hole, making chicks easier prey for starlings or raccoons.
In addition nest boxes require some additional maintenance. Nest boxes should be inspected once a year (usually in the winter) and
- Treat the nest box with a waterproof varnish if necessary
- If the roof is loose, the bottom warped, or a side cracked, take it down for repairs.
- If your box is not attracting birds (or it is attracting the wrong birds) you should consider relocating your box.
- Check to make sure that the box is still securely mounted. A poorly mounted box could fall with birds inside injuring them!
- Drill a few small holes on the sides of the box, just below the roof overhang to allow air and a little light to filter in. A few holes drilled in the floor near the walls will let moisture drain out.
Clean your Nest Box
Nest boxes should be easily accessible so you can see how your birds are doing and, when the time comes, clean out the house. Part of being a responsible nest box landlord is your willingness to watch out for your tenants. Monitor your nest box every week and evict unwanted creatures: house sparrows, starlings, rodents, snakes, and insects. Be careful when you inspect your bird boxes. You may find something other than a bird inside. Don’t be surprised to see squirrels, a mouse, a snake, or insects. Look for fleas, flies, mites, larvae, and lice in the bottom of the box.
Check your Nest Box
Watch the nest for awhile. If you don’t see or hear any birds, go over and tap on the box. If you hear bird sounds, open the top and take a quick peek inside. If everything’s okay, close the box. If you see problems (parasites or predators), remove them and close the box.
Here’s where a bird house with easy access makes the job simple. Most bird houses can be opened from the top, the side, the front, or the bottom. Boxes that open from the top and the front provide the easiest access. Opening the box from the top is less likely to disturb nesting birds. It’s impossible to open a box from the bottom without the nest falling out. While side- and front-opening boxes are convenient for cleaning and monitoring, they have one drawback: the nestlings may jump out. If this happens, don’t panic. Just pick them up and put them back in the nest. Don’t worry that the adults will reject the nestlings if you handle them. That’s a myth. Most birds have a terrible sense of smell.
If you clean out your nest boxes after each brood has fledged, several pairs may use the nest throughout the summer. Many cavity-nesting birds will not nest again in a box full of old nesting
Protecting your Nest Box from Predators
Cats—Nesting birds are very vulnerable to cats, as are fledglings and birds roosting for the night. Bell collars on cats offer birds little protection. Nailing a sheet metal guard or cone to a tree trunk is unsightly, but it may deter less agile felines. Houses mounted on metal poles are the most difficult for predators to reach, especially if you smear the poles with a petroleum jelly and hot pepper mixture.
Squirrels—Red squirrels, and sometimes gray squirrels, can become a serious menace to bird houses and the birds themselves. If you find your nest hole enlarged, chances are a red squirrel is the culprit. Once inside the box, squirrels make a meal of the eggs and young. Adding a predator guard of sheet metal to the entrance hole is usually enough to keep squirrels out.
Raccoons and Opossums—They will stick their arms inside nest boxes and try to pull out the adult, young, and eggs. Adding a predator guard to the bird house or to its pole support is a simple solution.
Snakes—Snakes are an important part of the natural balance between predator and prey. If you find one of these reptiles in your bird house, please don’t kill it. Snake-proof your house by putting it on a metal pole lathered with petroleum jelly and/or hot red cayenne pepper.
House Sparrows and Starlings—If you don’t discourage them, these two pest species, introduced from Europe, will bully or kill cavity-nesting birds. Since house sparrows and starlings are not protected by law, you may destroy their nests. But, remember, other birds are protected by law.
Insects—Many insects lay their eggs and pupate in bird houses. You should inspect your bird houses for signs of gypsy moths, blow flies, wasps, ants, gnats, and bees. You can keep bees and wasps from attaching their nests by coating the inside of the roof with bar soap. In areas where gypsy moths abound, avoid placing boxes in oak trees, which are favored by the gypsy moths.
Website Resources
- Sample Liability Waiver
- Sample Press Release
- Sample Sponsor Letter
- All About Birdhouses – Cornell Lab of Ornithology
- Create a Bird Friendly Habitat – National Wildlife Federation
- How to Build a Bluebird Box Video – Mike the How to Guy