Build a Compost Bin
Interstate Commission on the Potomac River Basin

What is a Compost Bin?
A compost bin is a structure designed to harnesses the natural process of decomposition by turning organic matter (such as fruit and vegetable wastes, grass clippings, leaves, and some types of animal manure) into a useful product for your landscape or garden. Compost bins work by facilitating the decomposition of organic matter through proper aeration and moisture retention. With the proper combination of air and moisture, ideal conditions are produced for the activity of aerobic organisms responsible for the high temperatures that transform the organic materials into compost.
Why Should I Create a Compost Bin?
According to the U.S. Environmental Protection Agency, lawn waste and wet garbage make up about 25 percent of the 1,500 pounds of trash that the average American generates per year. Every year we throw away 24 million tons of leaves and grass clippings that could be composted to conserve landfill space and reduce fossil fuel use. By composting, we cut back on the amount of waste that we send to the landfill – that is both good for the 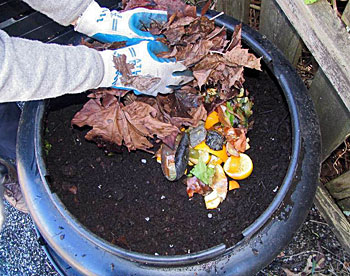 environment and good for our pocketbooks!
In addition to saving the environment, composting can help your yard look good. The compost material that you create can improve hard, depleted soils, so that flowers, vegetables, and fruit trees can thrive in a now nutrient-rich environment. Composting also improves the soil and reduces rainwater runoff by boosting its moisture-holding capabilities and its texture.
Composted material is actually rather expensive to buy. But anyone with a little extra room in a garden, a little extra time, and a good source of compostable materials can produce good, high quality compost in as little as 4 weeks – absolutely free! By composting, you return the earth’s nutrients back to the soil, where your plants absorb them, thereby becoming healthier. Healthy plants are far more resistant to diseases and pests. Instead of throwing away your organic waste, compost them!
Composting in Small Spaces
It is still possible to compost when you live in an apartment or condo, but composting in an urban setting can add a different set of difficulties than in suburban or rural areas.
There are many ways to go about composting in small spaces. The website, Highrises, has an excellent set of resources specifically for those that do not have access to a yard. (We would like to thank Kelsey, who earned her recycling and composting Girl Scout badge, for alerting us to this website.)
Developing Your Goals and Budget
Making a compost bin is not very expensive, however the costs can add up if you are trying to create many of them! Your goals for constructing the bins will in part determine the costs of their creation.
Goals
You may be building compost bins just for the members of your organization, or to sell to community members, or you may be making them as an educational tool for one or several schools in your watershed. Whatever the case, you will want to write out your specific goals and let them guide your work plan.
Some example goals:
- Reduce the dependence on commercial fertilizers and pesticides by homeowners in your watershed or community
- Reduce the amount of household waste going to the local landfill and educate community members about the next step in recycling
- Foster environmental stewardship and an interest in science by students, teachers, administrators, and members of the community
Cost
Compost bins come in two varieties—home-built or purchased. It goes without saying that store-bought compost bins are more expensive. In most cases it makes more sense to make a compost bin that suits your needs rather than purchasing one that may not be ideal.
The cost of building a compost bin is quite low, however it varies depending on the materials used and the size of the bin created. In general, the cost of the tools used in creating a compost bin is greater than the cost of a  compost bin itself.
We provide instructions for building two types of low-cost compost bins (the more expensive of the two will cost about $50 for materials), however there are many other designs available. Use the links that we provide to find the version that is right for your needs and your budget.
Financing
There are many ways to finance a compost bin project. The simplest method of cost cutting is to cut material costs by using leftover lumber. You can also partner with a lumberyard to get new or scrap lumber donated.
As previously noted, tools are the primary cost of building compost bins. You can cut these costs by asking members of your organization or friends to lend you their tools for the project. You can also ask your local high school wood shop class if they would be willing to donate their time to help cut lumber to prepare the compost bins.
If you are in need of funding for your project, you can also ask the recipients of the compost bins to make a donation or you can seek out grants. The Home Depot and Walmart offer grants for community environmental projects such as these. You might also try the Chesapeake Bay Trust (MD) and the Chesapeake Bay Restoration Fund (VA) or other environmental grant making organizations in your jurisdiction.
Steps for Creating a Compost Bin Event
Below is a sample timeline for a compost bin project where individuals will be building their own bins and the materials and tools will be provided by your organization:Determine the target area for the compost bins
- Order materials from supplier
- Arrange for a location to store and build the compost bins
- Arrange for materials to be delivered or to pick up the materials (NOTE: this may be an additional cost)
- Purchase or arrange to borrow needed tools
- Advertise the compost bin construction day through as many outlets as possible
- Create and print bin owner’s manual/educational materials
- Host bin construction day
- Arrange site visits or call homeowners to make sure that they understand how to use and take care of their compost bin and answer any questions they may have
Advertising your Compost Bin Project
There are lots of ways to advertise for an event and, unfortunately, no one way works consistently. Here are several options for you to choose from. The best outreach campaigns make use of several techniques and only you can know what is best for your project. Advertising options include:
- Creating and distributing door hangers to target a specific neighborhood where you would like to work
- Creating and distributing a press release to your local paper, radio stations and/or television stations (see the Resources section below for information on how to write and distribute a press release).
- Creating flyers and placing them in public libraries, recreation centers, and walking trails
- Post the event on social media sites such as Facebook and Twitter
- Running an advertisement in a local paper, or on radio stations and/or television stations
- Discussing the event at a targeted community association, church group, youth group, and/or service organization meeting
- Advertising your event on free on-line environmental calendars such as the Chesapeake Network
- Sending out an email to people you think would be interested and asking them to tell their friends as well
- Sending out a mass mailing to your targeted audience
Organizing a Compost Bin Construction and/or Distribution Day
It is not enough to have the construction materials for your compost bin ready for your event—some final preparations need to be made to make your construction/distribution day a success.
Construction
In advance of your event make sure that you have:
- Enough tools to share among participants without creating long waits

- Refreshments and snacks if possible or at least provide water
- Created and printed a sign-in sheet
- Created and printed enough directions for constructing the compost bins, with diagrams if possible
- Created a pre-constructed compost bin for demonstration purposes
- Done as much prep work for each compost bin as is possible—for example, put all the parts together with each compost bin or pre-cut the wood for the bin
- Called key volunteers and asked them to arrive early and be Team Leaders
- Organized stations or groups so that volunteers can be teamed up with Team Leaders to assemble their bins
- Put together an emergency medical kit and set up an emergency plan in case of an accident
- Made sure that bathroom facilities are available for volunteers
- Contacted local newspapers
- Designated a volunteer to take photos of the event
Distribution
It is not enough to give out the completed compost bin and assume that they will be used correctly. In advance of your event make sure to:
- Create or set aside a compost bin to demonstrate proper use
- Bring a proper mixture of compostable items, items that are not compostable, and the tools necessary to compost
- Prepare the demonstration site so that the demonstration will go quickly and smoothly
- Create and print instructions for using the compost bin if possible with diagrams
Creating a Compost Bin
Below are instructions for two different compost bins. The first is a very simple, very inexpensive bin that is ideal for those just getting started. The second bin is sturdier and requires more effort to build. The general structure of the two bins is the same so you can take the general plan and build your own to match your needs.
If you are creating one of the more complex bins, you may consider completing some of the steps requiring cutting or drilling before the volunteers assemble the compost bin in order to save time and to minimize the number of people using potentially dangerous tools. If you decide to build a bin that is different than the ones we describe, remember that the minimum effective size for a compost bin is 3′ by 3′ and the maximum effective size for a single bin is 5′ x 5′.
Materials
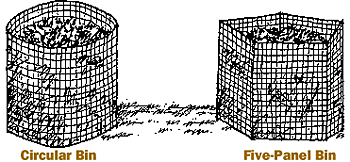
Bin 1 – Round Wire Compost Bin
- 12½ feet of 36″ wide 1″ poultry wire, or ½” hardware cloth, or 16-gauge plastic coated wire mesh
- 4 metal or plastic clips, or copper wire ties
- 3 or 4 four foot wooden or metal posts for poultry wire bins
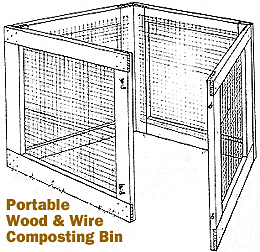
Bin 2 – Portable Wood and Wire Bin
- 4 twelve foot pressure treated 2”×4”
- 12 feet of 36″ wide ½” hardware cloth
- 100 1½” galvanized No. 8 wood screws
- 4 3″ galvanized butt door hinges
- 150 poultry wire staples or power stapler
- 1 10 oz. tube exterior wood glue
- 6 large hook and eye gate latches
Tools
Bin 1 – Round Wire Compost Bin
- Heavy duty wire or tin snips
- Pliers
- Hammer or metal file
- Work gloves
Bin 2 – Portable Wood and Wire Bin
- Hand saw or circular saw
- Hammer
- Screwdriver
- Tin snips
- Caulking gun
- Pencil
- Small carpenter’s square
- Tape measure
- Saw horses
- Long straight edge or chalk snap line
- Screwdriver or Drill with screwdriver drill bit
Building your Compost Bin
Bin 1 – Round Wire Bin
In the case of the round wire bin, you are almost there! Roll out and cut 12½ feet of poultry wire, hardware cloth or plastic coated wire mesh using the wire snips or tin snips. If you use poultry wire, roll back three to four inches at each end of the cut piece to provide a strong clean edge which will be easy to latch and won’t poke or snag. Now form the wire in the form of a circle and secure the ends with clips or wire ties. Your bin is now ready go! Bring the bin to the place where you would like it to be and then space the posts around edge inside wire circle. Hammer the posts firmly into the ground while tensing them against wire to provide support. You now have your compost bin!
Bin 2 – Portable Wood and Wire Bin
This portable bin provides a convenient way to compost moderate volumes of yard wastes with minimal labor. Yard wastes are simply added to the bin as they are generated. With no effort besides occasional moistening, compost will be ready in 6 months to 2 years. This bin is very flexible. It fits well in small spaces, and may be used either as a yard waste holding bin or as a portable turning unit. The bin can be easily moved to turn piles or to harvest finished compost and build a new pile: Simply undo the latches, pull the sides apart and move it. Compost may then be turned into the bin at its new location, and finished compost can be removed from the bottom.
Step 1 – Mark and Cut the Wood for the Compost Bin
- Cut each 12 foot 2×4 into four 3 foot long pieces.
- Then cut a ¾” deep and 3-½” wide section (a lap cut) from both ends of the 3 foot long pieces for a total of 32 cuts. If using handsaw and chisel, cut 3/4″ down through the board 3-½ inches from the end of the board. Then cut a ½” deep groove into the end of the board. Place a thick wood chisel in the end groove and split the wood with a hammer to the 3-½ ” cut. If using a radial arm saw, circular saw or table saw, set blade depth to ¾” and make multiple passes until the whole section is removed.
Step 2 – Join the Cut Wood Together to Make Four Frames
Make four 3 foot square frames from the lap jointed 2”×4”s. Put enough construction adhesive to fill the gaps when the lap joints are screwed together. Fasten each joint with four screws.
Step 3 – Cut the Hardware Cloth and Attach it to the Frames
- Cut the hardware cloth (wire mesh) with tin snips into four 3 foot square sections.
- Bend the edges of the cloth back over 1″ for strength.
- Lay one onto each of the four frames.
- Center and tack each corner with a poultry wire staple.
- Hammer place a staple every 4″ along all four edges of the hardware cloth. Try to tension the cloth so it will not sag when filled with compost.
Step 4 – Connect the Frames Together
- Connect each pair of frames together with two hinges.
- Then put the hook and eye gate latches on the other ends so that the sections latch together.
Step 5 – Paint or Stain Your Compost Bin (if desired)
Using and Maintaining Your Compost Bin
What to put in your bin
There are four basic ingredients in the compost pile, nitrogen, carbon, water, and air.
Nitrogen – The nitrogen in your compost pile comes from green materials such as grass clippings, fresh leaves and twigs, vegetable and fruit trimmings, and coffee grounds and filters. Most any organic material that has moisture or ‘life’ still in it is considered a green material.
Carbon – You are adding carbon to your compost by adding brown materials such as dry leaves and grasses, straw, wood chips, corn stalks, shredded newspaper, paper towels, napkins, and cardboard.
Water – Occasionally adding water to the pile will balance the correct moisture level. The proper moisture should be about the same as a wet sponge that has been squeezed to remove moisture.
Air – Oxygen is very important to the organisms that are working in the pile to breakdown the organic material. Bacteria, fungi, microorganisms, and insects need oxygen to breathe and air space in which to move throughout the pile.
Where to locate your bin
Place your bin at least two feet away from any permanent structure. It should be partially shaded and near a water source. Don’t place it too close to your garden because it might attract slugs, but don’t place it too far away because it won’t be convenient! Make sure that there is a source of water nearby so that you can occasionally moisten the compost.
Composting Dos and Don’ts
Do turn your aerobic bin regularly. Once every 6-7 days is ideal, but it can be done as seldom as once a month. This will insure that air is supplied to all parts of the pile, and that all the material gets composted. When turning the pile, put the material from the middle of the pile outside, and vice versa, so that all the material will be composted.
Do water your compost pile if it is not moist like a sponge. If it gets too wet, air will not be able to get through the pile, and foul odors may arise. If the pile gets too dry, decomposition will stop. Both aerobic and anaerobic systems need water, but the anaerobic will require less overall.
Don’t put any meat, dairy products, fats, or oils into the compost pile. These materials tend to putrefy instead of breaking down, and will attract a wide variety of pests, including flies, rats, raccoon, stray dogs and cats, etc.
Don’t put dog and cat wastes into the compost pile. The manure from any animal that eats meat contains several pathogens that survive the compost process, and affect any fruits or vegetables on which the compost may be used.
Additional Resources
- Sample Liability Waiver
- Sample Press Release
- Sample Sponsor Letter
- Backyard Gardener provides additional compost bin designs
- US Composting Council
- Guide to Apartment and Condo Composting
**Have you completed a project listed on W.A.T.E.R.? Send us a photo and we’ll feature your group in our Newsletter and Facebook page!**