When is a forest more than a forest? When it is managed specifically as the source of drinking water for an entire city. Hence, Frederick Municipal Forest is more than a forest. It provides clean, fresh drinking water for the 70,000 people who live downstream. Do you need more of a reason to love it? The well-maintained labyrinth of trails is a locally known secret to many hiking and mountain biking enthusiasts.
“The Frederick Watershed is a gem, a forest that protects the water supply and critical habitat for 22 threatened and endangered species, while providing a backcountry experience just outside the city,” says Jenny Willoughby, Sustainability Manager for the City of Frederick.
Located along the ridge of Catoctin Mountain in western Maryland, the forest is accessible off Gambrill Park Road. It is also a short drive from the charming town of Frederick, Maryland. Although camping is not allowed in the Frederick Municipal Forest, Gambrill State Park is just down the road and provides a variety camping options.
Join the Interstate Commission on the Potomac River Basin and the City of Frederick for a guided hike through the Frederick Municipal Forest on Saturday, June 8th. The hike is part of ICPRB’s Walk in the Woods Series and the City of Frederick’s Sustainability Committee’s Green Lecture Series.
If you are looking for things to do, whether it is in the water, on the land, or in a building with an HVAC system, there is always fun events in the Potomac River basin! Below is a wide variety of activities, including volunteer opportunities, fun activities for the kids, water recreation, and more!*
Photo Credit: Burke Lake Park by Martin Chen (Flickr)
Are you a golfer? A train enthusiast? Are you into volleyball? Fishing? Or maybe orienteering is your thing. Whatever it is, Burke Lake Park has you covered. This 888-acre park in Fairfax Station, Virginia boasts a variety of activities for all interests, ages, and abilities. Just visit for the day or stay overnight at the Burke Lake campground.
Burke Lake has a 4.7-mile scenic trail along its shoreline that is perfect for bikers, hikers, and walkers. It was voted one of the top best fitness trails in the nation by American Hiking Society.
Bring your boat or rent one to get out on the lake. They have fishing kayaks, canoes, or electric motorboats available on a first-come, first-served basis. The lake is known for the strong largemouth bass population so don’t forget your fishing pole.
Kids and adults adore riding the Miniature Central Specific Huntington Steam Engine. A $5 ticket gets you a 10-minute ride through the woods on the mini-train. After your train ride, head over to the carousel for some old-fashioned fun.
Amenities at the Park will provide a sporting-good time. There are three types of golf—mini-, regular-sized, and frisbee golf—plus, a driving range to practice your swing. You can feel the sand beneath your feet as you spike a ball on their volleyball courts.
Adventurers can try their hand at orienteering, a navigational sport that uses a map and compass. There are three different maps to choose from: beginner, intermediate, and advanced. Geocaching sites are located throughout the park as well.
Join Park staff for one of the many interesting classes and activities, like Twilight by Kayak, Campfire Cooking, and Birdwatching for Beginners.
Visit the Burke Lake Information Center for orienteering maps, frisbee golf score cards, and more information on ways to enjoy your visit to the Park.
Don’t forget to wrap-up the fun day with a hand-dipped scoop at the Burke Lake Park ice cream parlor.
You might think field upon field of bright yellow sunflowers are found only in provincial Italy or France and other places known for romance and beauty. But there are 2,000 acres right in our backyard that will make you feel transported to a more magical time and place. Known as the McKee-Beshers Wildlife Management Area (WMA), staff at this park plant acres of sunflowers to attract and feed pollinators and birds. For a couple weeks each year (around the end of July) the WMA is alight with seemingly endless summery flowers.
Photo Credit: Instagram user @walkablefrederick
Just like birds, people flock to the area for family photos, nature photography, and just to enjoy the sites. Catch the flowers at full bloom over the next couple weeks. Meandering trails throughout the fields let you explore without damaging the flowers. However, look but don’t pick; plucking one of these beauties is prohibited at the WMA.
When the sunflowers aren’t the main attraction, there are plenty of trails to hike or bike in the area. Since they are connected to the C&O Canal trail system, the WMA trails makes for a nice side trip or starting point on the Canal. Hunting waterfowl, deer, wild turkey and other animals is allowed (within hunting regulations). There is even a specially managed dove field open to the public for hunting. Birding and wildlife photography are popular activities at the WMA due to the abundance of wildlife, including 200 species of songbirds found in the area. The more adventurous can take a boat across the Potomac to reach Maddux Island, which is part of the WMA.
A beautiful trail follows some of the perennial marshy flatlands where waterlilies and other aquatic plants abound. Parts of the WMA are managed as a greentree reservoir, a term used for bottomland hardwood forest that is flooded in the fall and winter. This attracts colorful migrating waterfowl, such as wood ducks.
The park, in western Montgomery County, Maryland, is conveniently located right off River Road. It is not difficult to find, just plug “McKee-Beshers Management Area” into your GPS and look for the parking lots full of cars and people in incongruously fancy dress for a hike. After all, this is a popular place to take family photos. There are several ways to access the fields, but most involve a short walk through the woods that is often muddy, so make sure to wear appropriate footwear. No bathroom facilities or benches are provided, so please plan accordingly.
You might think field upon field of bright yellow sunflowers are found only in provincial Italy or France, places known for romance and beauty. But there are 2,000 acres right in our backyard that will make you feel transported to a more romantic time and place. Known as the McKee-Beshers Wildlife Management Area (WMA), staff at this park plant acres of sunflowers to attract and feed pollinators and birds. For a couple weeks each year (around the end of July) the WMA is alight with seemingly endless summery flowers.
Just like birds, people flock to the area for family photos, nature photography, and to enjoy the sites. Catch the flowers at full bloom this year for the two weeks following July 24. Meandering trails throughout the fields let you explore without damaging the flowers. However, look but don’t pick; plucking one of these beauties is prohibited at the WMA.
When sunflowers aren’t the main attraction, there are plenty of trails to hike or bike in the area. Since they are connected to the C&O Canal trail system, the WMA trails makes for a nice side trip or starting point on the Canal. Hunting waterfowl, deer, wild turkey and other animals is allowed (within the usual hunting regulations). There is even a specially managed dove field open to the public for hunting. Birding and wildlife photography are popular activities at the WMA due to the abundance of wildlife, including 200 species of songbirds found in the area. The more adventurous can take a boat across the Potomac to reach Maddux Island, which is part of the WMA.
A beautiful trail follows some of the perennial marshy flatlands where waterlilies and other aquatic plants abound. Parts of the WMA are managed as a greentree reservoir, a term used for bottomland hardwood forest that is flooded in the fall and winter. This attracts colorful migrating waterfowl, such as wood ducks.
The park, in western Montgomery County, Maryland, is conveniently located right off River Road. It is not difficult to find, just plug “McKee Banshee Management Area” into your GPS and look for the parking lots full of cars and people in incongruously fancy dress for a hike. After all, this is a popular place to take family photos. There are several ways to access the fields, but most involve a short walk through the woods that is often muddy, so make sure to wear appropriate footwear.
Non-native invasive (NNI) plants are exotic species that are also ecological pioneers and colonizers. They are plants that, once introduced, can quickly establish themselves in ecologically disturbed communities. Non-native invasive species typically displace native flora because they have faster growth rates, efficient dispersal mechanisms, and tolerance of a wider range of conditions. Because they are not normally found in the region where they have been introduced, non-native invasive plants often lack natural predators and diseases that control their populations in their native environments.
It is important to emphasize that not all non-native species are invasive and that not all invasive species are exotic. Many of the plants found in nurseries are not native to our county, and neither are many of the crops that we grow. Does that mean that they are bad? Not necessarily. Many non-native plants lack the characteristics to spread rapidly in a new environment and never become a problem. On the other hand, some native species become invasive when their environment is disturbed in a way that favors them over other species.
Why Should I Organize a NNI Removal Event?
Invasive plants have become recognized in recent years as a major threat to the integrity of natural areas. These species have the ability to invade natural systems and proliferate, often dominating a community to the detriment and sometimes the exclusion of native species. Invasive species can alter natural ecological processes by reducing the interactions of many species to the interactions of only a few species. Introduced species may compete directly with native species for nutrients, sunlight, and space, and indirectly by altering the food web or physical environment. Invasive species may also prey on or hybridize with natives. Native species with limited population size or ecological range are particularly susceptible to displacement by aggressive exotic or translocated species.
According to a 1996 report by the Nature Conservancy, invasive species have contributed to the 42 percent population decline of threatened and endangered species in the U.S. Many also pose threats to agricultural areas, urban parks, yards, and roadsides. While only a small percentage of the 4,000 estimated exotic plant species in the U.S. cause problems, just 79 non-native plant and animal species have already cost the U.S. economy $79 billion. Non-native species threaten two-thirds of endangered species worldwide, and are considered by some to be second most important threat to biodiversity after habitat destruction.
Anywhere human disturbance of the environment has occurred, there is the potential for NNI species to colonize and disrupt the natural environment. Some common sights include:
Vine species like English ivy and kudzu shading out and pulling down trees that had stabilized steep slopes, creating an erosion problem;
Wetland species like purple loosestrife escaping cultivated gardens, establishing along river and stream banks and driving out native and sometimes threatened or endangered species; and
Trees, such as tree of heaven, growing several feet a year and out competing native species through a toxin that it excretes, killing other plants around it.
Developing Your Goals and Budget
Non-native invasive plant removal is not expensive to perform; unfortunately, it is a huge undertaking in most areas. It is important for this work to set realistic goals based on the number of volunteers you have and the scope of the non-native invasive species problem in your watershed.
Goals
You may be attempting to remove NNI species from a local park, or from your member’s gardens, or you may be targeting a stream valley where purple loosestrife is running rampant, or attempting to save a group of 200-year-old trees threatened by ivy. Whatever the case, you will want to write out your specific goals and let them guide your work plan.
Some example goals:
Increase awareness in your watershed of the problems associated with non-native invasive species;
Help citizens see firsthand the impact their efforts can have to improve habitat in your local watershed,
Encourage and empower citizens to participate in other activities aimed at improving water quality in their watershed.
Budget
Cost
The cost associated with putting on an invasive species removal event can be as low as the cost of your time. Removing invasive species can provide excellent publicity for your organization and others who helped you put it together. If approached, businesses are often willing to cover the costs of many of your necessary items.
Some example costs include:
Flyers – As little as $0.03 a copy (black and white). The cost can vary depending on how many you create and if you decide to use color.
Trash bags – Four dollars for a box of twenty. It is generally recommended that the plants go in plastic bags to the waste facility, not to a composting facility, as that con further the spread of the species.
Tipping fees – Depending on the amount of materials collected, these costs can be considerable ($400.00 or more) however they are generally waived for cleanup events.
Food and drinks – Again it depends on the number of participants and how extravagant you want to be. Often water, donuts, coffee, and juice will suffice.
Tools, gloves, and safety vests – You can ask participants to bring their own gloves and tools. Safety vests cost about $10.00 a piece.
First aid kits – A good kit runs approximately $20.00.
Financing
Because it does not cost a lot of money to put together an event of this type, you may not require any help in financing your work. If you are interested in getting some help to accomplish your goals, there are a lot of places to look for it.
Your local dump – the most expensive part of any invasive species removal are the tipping and hauling fees. Request to have the tipping fees waived for the vehicles carrying the invasive plants you collected.
Trash collection services – you may be able to get a local trash collection service to donate their services in picking up and hauling the plants you have removed. You can also ask the property owner if s/he will arrange for the pickup and hauling away of the invasives you collected—after all, you just helped improve their property!
Your local government – may be able to lend you tools and gloves or may help haul away your work.
Local business people, club leaders, and government officials. Ask them to give what they can: cash, equipment, supplies, or services. Trash bags and gloves are a must and can often be obtained as “in-kind” donations from grocery or supply companies. Food and drinks for the workers are essential and can usually be obtained through donations. Restaurants and local grocery stores might give you refreshments. Don’t forget first aid supplies – this activity, while not dangerous, can cause cuts and bruises!
Timeline for a Non-Native Invasive Species Removal Event
The act of removing invasives is relatively straightforward, however there is a lot of additional work that must take place before and after the event takes place.
At least two months in advance
Determine appropriate location(s)
Get permission in writing from local government or landowner
One month to one week in advance
Advertise the invasives removal event through as many outlets as possible
Several days before event
Deliver flyers in the neighborhood announcing the project
Purchase needed supplies
Create and print instruction sheets for volunteers and informational door hangers for neighborhoods where invasive plants will be removed
Day before or day of the event
Deliver materials and tools to the work sites
Post event
Maintain the area where the plants were removed. Consider assigning a team of volunteers to “maintain” the pulled area. It often takes 3-5 years to deplete a seed bank in order to discourage the return of non-native invasive species.
Organizing a Non-Native Invasive Species Removal Event
Establish an organizing committee: a core group of individuals dedicated to organizing and implementing the invasive species removal event.
First determine location of invasive species removal and project date (remember to choose a rain date).
Next the committee should conduct a site visit, arrange for plant disposal, recruit volunteers, gather materials and supplies, contact property owners, and solicit project support.
Site Selection
Determine the invasive removal project site or sites. Where you remove these pests is just as important as why you are doing it. Volunteer participation is critical to a successful event, but site selection is almost as important. Here are a few questions to guide you:
Where are the areas where the pest specie grows out of control?
Is the area big enough to host all of your volunteers?
Is permission required to work on the land? (Landowners and parks have policies and regulations. Many parks require that leaders be trained in plant identification before an invasive removal event is held on their property. Please respect these policies.)
After you remove the plants, how will you dispose of them?
The goal is to increase native plant habitat and create healthy forests and watersheds — not to interfere with balanced ecosystems. You may consider focusing on areas of special need: communities working for environmental justice, high impact areas, land with ecological diversity, historic farmland, agricultural communities, or preserves.
Scouting
A member of the organizing committee should walk the area 8 to 10 weeks before the event. A scouting survey of the removal area will give a better idea about the amount and types invasive plants volunteers to be removed. A survey will also allow the committee to approximate how many volunteers will be needed for the removal event.
A member of the organizing committee should also walk the area two weeks prior to the project date. During this walk, the committee member should create a series of maps that will help crews locate work areas. The surveyor should also note whether invasives can be hauled out on foot and if any special equipment may be necessary.
When scouting your watershed for an invasives removal site, consider the following factors:
Is the site safe?
Is the site accessible to volunteers (easy to enter and exit)?
What was the site used for in the past?
Is the site too large for a single removal day or will several events be required?
Are there any sensitive areas that should be treated with care?
Are there hazardous substances present that make a stream unsuitable for an invasive species removal by volunteers?
Project Date
Select the project date and time of the event. Determine the date 8 to 10 weeks before the event. Typically, Saturday mornings or Sunday afternoons are the best time to schedule an event like this. Be careful to avoid a holiday weekend or a weekend when the switch is made to and from Daylight Savings Time. The organizing committee should also allow adequate time for project planning and volunteer recruitment. If equipment will be borrowed, the organizing committee should make these arrangements first, and select a day when the equipment is available. Remember to establish a rain date!
An invasive species removal event typically lasts about four hours. The organizing committee should also plan an additional half-hour before the event for setup and a half-hour afterwards for cleanup. Additional time may be required after the event, if a picnic or barbecue is planned.
Central Meeting Place
Locate and reserve a central meeting place. A parking lot is an ideal central meeting place, if it’s not in use on the project date. On Saturdays, school, bank, office, or church parking lots are usually empty. The organizing committee should receive permission from the proper authorities before designating a parking lot as the central meeting place. A letter, including the project purpose, date, time, and a promise to leave the parking lot clean, will typically receive a favorable response.
Avoid high traffic areas and always use extreme caution. If volunteers will not have access to a restroom, seek permission from a local business to use their facilities if necessary. If facilities are not made available through local businesses, the organizing committee should arrange for the rental of portable facilities.
Invasive Plant Disposal
Arrange for the disposal of the removed and collected plants. The organizing committee should first contact local government officials to determine what services they can provide including:
Removal of trash bags after the cleanup is complete;
Removal of plant material too large for trash bags;
Transportation for disposing of removed plant material.
If local officials are unable to help, the organizing committee should:
Contact the closest landfill and confirm the days and hours of operation. It may be necessary to schedule the cleanup earlier in the day to allow enough time for delivery to the landfill;
Consult local, private companies that may be able to provide assistance.
Obtain Permission
Obtain written permission from landowners with property in the proposed work area. Venturing onto private property without permission is trespassing; you may be subject to arrest. The organizing committee should invite the property owner to participate in the event. If the property owner cannot participate, the organizing committee should obtain written permission for volunteers to remove invasive plants from their land. If you are unsure of the landowner, county tax maps, located in county planning offices, can provide property ownership information. The organizing committee can also determine the property owner by talking to people who live close by.
Before sending the removal teams out to work, the organizing committee should emphasize the importance of staying on public property and public roads, except where expressed permission has been given by the property owner.
Volunteer Recruitment
Recruit volunteers from your local community. Anyone can assist in a non-native invasive species removal project. Children under the age of 18 years should be encouraged to participate but should have permission from parent or guardian. The organizing committee should provide adequate supervision: one adult supervisor for every six children.
Group size depends on the amount of invasives and area of land at your removal site. A removal event could involve anywhere between five and 50 people. Consider the number of volunteers you can effectively manage and still ensure the enjoyment of all.
Potential volunteer sources include:
Residents
Employees of nearby businesses and industries
School groups (classes, science / ecology clubs, etc.)
Church groups or members of other places of worship
Scout troops
Community Associations
Environmental, outdoor and sporting groups
Initiate volunteer recruitment approximately 6 weeks prior to the project date. We recommend contacting groups via telephone and getting an announcement posted on email listservs. Event calendars (including places of worship and organizational bulletins) and word of mouth also are effective. As a rule, 50 percent of those people who initially sign up for an event will not actually participate. For this reason, the organizing committee should aim to recruit twice as many people than will be needed for the project.
The organizing committee should establish a phone number or email address that volunteers can contact to register for the event. When volunteers register, get their name and contact information. As volunteers respond to recruitment activities, members of the organizing committee should advise them on what to bring and how to dress. Recommend that volunteers wear sturdy shoes or boots, clothing that they don’t mind getting dirty, work gloves, and a hat or outerwear as the weather dictates. Volunteers should also be encouraged to use sunscreen and insect repellent.
The organizing committee should recruit, from the volunteer labor force, several field supervisors or site captains who will assist volunteers during the collection event. Approximately one supervisor should be recruited for every 10 volunteers. The organizing committee should host a training session for these supervisors prior to the project date, so that their role can be defined. The organizing committee should send reminders of the date (and rain date) and time of the event, as well as maps showing the location of the central meeting place to all registered volunteers one week before the event. If time allows, committee members may also call the volunteers a few days before the event to confirm participation in the seed collection.
Event Publicity
Advertise the project as much as possible. Event publicity should complement your volunteer recruitment efforts by drafting, reproducing, and distributing fliers; drafting and distributing press releases to local newspapers and/or organizational newsletters, and offering presentations at group meetings.
Recruitment messages should include the name, day, date and starting time of the event, the rain date, location and directions to the central meeting place, name of the group or organization doing the work, and a contact’s name and information.
Recruitment messages should be enthusiastic and include a “sales pitch.” A sales pitch should emphasize the enjoyment of the activity and emphasize proximity to potential volunteers.
Have a phone number or email address where volunteers can register and include the information in all advertisements.
Refreshments and Other Rewards
Refreshments are one way to thank volunteers for their valuable time and hard work. It is recommended that the project sponsor provide non-alcoholic beverages. If beverages will not be provided, the organizing committee should encourage participants to bring their own. Simple refreshments (coffee and doughnuts, cookies and punch) may be offered during registration, or as a time for volunteers to celebrate a job well done at day’s-end. A picnic or a barbecue is also a nice way to thank volunteers. Local businesses and/or the volunteers themselves (pot-luck) may be willing to donate food/drink, coolers, cups, ice, paper goods, etc.
The organizing committee could also consider providing rewards, such as certificates, bumper stickers, tote bags, caps or t-shirts. The committee may solicit contributions, both monetary and in-kind services, from local businesses.
Team Leader Training
As soon as you have scheduled your invasive species removal event and created your materials, it is a good idea to schedule volunteer team leader training. Keep your training brief, informative, and fun. Be sure to cover safety, liability, invasive plant identification, and removal methods.
The team leader’s responsibilities include:
Introducing each of the volunteers and explaining their roles;
Showing volunteers the work area (if specifically marked) and/or identifying invasive plants to be removed;
Briefing volunteers on removal techniques;
Being a point of contact in case of emergency;
Informing volunteers about the availability of refreshments and location of restroom facilities, and;
Helping to clean up the removed plants.
Materials
Below is a list of materials that you may need for your event. The exact materials will depend on the type of invasive plant that you are removing and the conditions at your particular site.
Wheel barrows
Hand shovels
Iron rakes
Leaf rakes
Mulch
Pruning tools
Gloves
First Aid Kit
Hand cleaner
Flagging tape
Hand cleanser
Volunteer safety vests (optional)
The Invasives Removal Event
In advance of your event make sure that you have:
Enough bags, gloves, shovels and other equipment to outfit your volunteer teams;
Copies of your written permission from the local landowner;
Refreshments and snacks if possible or at least provide water;
Created and printed a sign-in sheet;
Created and printed a liability release form;
Created and printed enough invasive plant identification cards and directions on their removal;
Marked areas where invasive removal will take place, or marked a map with work areas;
Done as much prep work as is possible—for example, put all the necessary equipment together for each team;
Identified key volunteers and asked them to arrive early and be Team Leaders;
Created a press packet for any media that cover the event;
Contacted local newspapers; and
Designated a volunteer to take photos of the event.
When your volunteers have arrived, have them sign and return their liability release forms and then break them up into groups to work with a team leader. The team leader will work with the volunteers to ensure the correct plants are removed and that areas with sensitive species are avoided.
Provide a sign-in sheet for volunteers at the central meeting place on the day of the event. The sheet should include spaces for the volunteer’s name, address, phone number, and email address. (Remember to provide pencils or pens.) Volunteers who have not completed and signed a safety liability release form must do so before participating in the invasives removal. Nametags will help volunteers get to know each other.
Also think about introducing the event and making the connection between the day’s work and the health of your local forests and waterway. Many people have an interest in their local streams but don’t understand much about river systems. You may wish to provide a map of your local waterway so that people can orient themselves in the watershed and make the visual connection between the work site and the river.
Be sure to emphasize the importance of the participants’ safety before sending them out. Make sure that the participants work in teams and that you know where your participants are going and when they will return. Make sure to account for your participants as they return from their assigned areas.
Pass out invasive plant identification materials and maps to specific work sites. Also hand out the tools and collection bags to each volunteer. Finally, brief them on removal techniques and send them out to work. Give them a specific goal to complete because otherwise (sadly) they will likely never feel finished. If they wish to continue after they have completed their task, ask them to help another group with their work. Make your event as enjoyable as possible for volunteers. Consider providing music – a portable radio or two can lighten the mood and turn the work into an enjoyable event. Locate a convenient shady spot where workers can rest, and provide seating and refreshments.
Removal Methods
There are many different methods for non-native invasive plant removal and not all work with each species of invasive plant or each circumstance – for example a controlled burn is not generally possible in an urban environment, or mowing may not be possible on a steep bank. Neither of these methods is conducive to volunteer pull events and manual methods should be the focus of your event. Leaders should be trained in invasive plant removal methods and there should be enough leaders to effectively oversee volunteers.
Manual Methods:
Hand pulling: Pull seedlings and small or shallow-rooted plants when soil is moist. Dig out larger plants, including the root systems. Use a spading fork or weed wrench for trees or shrubs. To prevent spread of seeds of undesirable ornamental plants, cut off flowers and/or seeds or fruits before they ripen then bag them and send them to the landfill.
Cut a “window pane”: If vines growing up trees and their root systems are very large, use this method. Cut the vine at the base of the tree and at shoulder height to create a “window pane” and remove the vines from that area. Then remove a swath around the base of the tree. The vines above the cut area on the tree will eventually die and fall off.
Girdling: For trees girdle the tree by cutting through the bark and growing layer (cambium) all around the trunk, about 6″ above the ground. This technique in effect starves the tree of the water and nutrients that it needs to survive. Girdling is most effective in spring when the sap is rising, and from middle to late summer when the tree is sending down food to the roots. Clip off re-growth.
Post Removal Work
Allow time at the end of the day for participants to relax, socialize, and enjoy the fruits of their labor. Take the time to review the work accomplished. In doing so, you are letting your volunteers know how successful they were and giving them a sense of pride and ownership of the work site. This will help in recruiting them later. You may even recruit volunteers to revisit the area to keep it clear of invasives.
After the volunteers have finished their work, the job is not done. If you are bringing the removed material to the dump yourself, leave time to load the material into trucks and to drive to the dumpsite. If someone else is going to collect the plant material, help them do their job by bringing the material to a central location. DO NOT DUMP CUT INVASIVE PLANTS IN THE WOODS! Doing so can actually propagate the plants further because they often react to being cut by sending out new shoots and roots.
After the removal you should thoroughly document your work and monitor and revisit the site regularly to monitor its recovery. You should document your work by mapping the exact location of the removal work both on a map and by placing markers at the site. Include information on the type of invasives found at the site before removal and the degree to which the site was infested. Quantify the amount of invasives removed from the site (number of bags of plants, weight of materials, or some other measure). Whatever measure you use, remember to be consistent from one removal event to the next. Include recommendations on following up at the site with additional removal work, native planting, slope stabilization, etc.
Follow Up
After the invasives removal event, please remember to collect the sign-in sheets. Use this information to generate certificates of appreciation for each volunteer and organization involved in the event. You can also compile the information into a community database of individuals and organizations to facilitate networking among groups and individuals interested in water quality issues.
Publish the photos taken during the event along with the statistics from the day’s work (number of volunteers, amount of invasives removed, size of area cleared). Contact the local media that helped you advertise before the seed collection and share your results. Also contact the event sponsors sending them a thank-you and the results of the event. Be sure to recognize everyone in the community who made your success possible.
When the event is completed, it is important to evaluate what you accomplished. It will help future planners to capitalize on your successes and avoid your mistakes. But you can’t wait until the end of the event to think about evaluation. An evaluation committee should be chosen in the planning stage to monitor the entire sequence of events, noting what worked well and what went wrong. Poll your volunteers as they leave, either by providing a questionnaire or by simply having the team leaders ask their crews what they thought of the event. Within a week, get your committee together and make a list of what went well, what needed improvement, and what, if anything failed completely. What problems did they have? What would they do to improve future events? Use this information to help plan your next event so that you continually learn from your efforts.
Source: Maryland Native Plant Society http://www.mdflora.org/
On behalf of the ICPRB Commissioners and staff, I wish you a happy New Year, and pledge that the Commission, in partnership with the basin states and our many agency partners will spend 2017 working for a healthier Potomac basin.
We begin this New Year by reinstituting the Commission’s newsletter, the Potomac Basin Reporter, distributed electronically to save money and trees. The Reporter, published quarterly, will join the Potomac News Reservoir, social media pages, and our website in keeping basin stakeholders informed about Potomac basin water quality and resources issues and how ICPRB and other agencies are working to protect the river’s values.
In addition, the Reporter will include stories about the places, people, and activities that make the basin’s waterways an important part of residents’ lives. We also will publish updates on the river’s flow and how it changes seasonally and annually, as well as other features.
The Reporter will afford us a chance to provide lengthier, more-complete articles on subjects affecting the basin’s water quality, quantity, and resources. It also will allow opportunities to encourage the public stewardship needed to ensure the basin’s resources for future generations.
We are excited to begin this effort to create a more informed and involved community focused on preserving and improving the health of the Potomac River and its many uses. We welcome comments and criticism that will help make this effort useful and valuable to the basin’s residents. We look forward to hearing from you.
H. Carlton Haywood, ICPRB Executive Director
Weird River Resident
Let’s play a game called “Guess the Weird River Resident”. Here are your clues: There are 1700 species and they are found on all continents except Antarctica. They look like a tiny version of a creature that would chase you through the woods in Jurassic Park. Stream monitors love to find them as they are a sign the stream is clean, cool and has high dissolved oxygen. The males of the species start a tiny jam band to attract the females. Have you guessed the river resident?
If you guessed stonefly larva, you win! But what about the tiny jam band, you ask? To attract females, the males make drumming and tapping sounds on the rocks. If the prospective lady-friend is interested, she repeats the sounds back to him. The noises are repeated until they find each other, and everlasting insect love. Which, in this case, only lasts 1-3 weeks, the typical lifespan of an adult stonefly. (Photo Credits: Larva by Instagrammar @lizziedee13, Adult by Zachary Smith)
Next Generation Brings Watershed Stewardship to Campus
ICPRB’s Score Four Program makes headway in Prince George’s County, Maryland.
Maryland has more than 10,000 miles of rivers and streams—spanning from the Appalachians to the Eastern Shore—each being of vital importance to the Chesapeake Bay. Our treasured waterways range from small, unnamed creeks in our neighborhoods to the grand Potomac River. They serve as habitats for species that are important to maintaining a healthy ecosystem and provide essential natural services to our environment. We depend on our waterways to help grow our crops, feed our reservoirs, and provide food, drinking water, and recreational activities. The value they provide is of great importance. It is imperative that we keep our streams healthy because the water, life, and pollutants in them eventually flow into larger rivers and the Chesapeake Bay. The quality of the Bay is dependent upon the quality of our streams.
Unfortunately, only 20 percent of Maryland streams meet the criteria for “good” condition. Most streams have eroded stream banks, are polluted and filled with sediment and litter, and lack an abundance of wildlife. With 80 percent of our streams in poor or fair condition, we should all work to protect them and to improve their water quality. This past school year, students in Prince George’s County, Md. did just that. More than 400 students removed approximately 700 square feet of turf grass and replaced it with gardens containing more than 200 native trees and plants that increase infiltration and absorption of runoff, reducing the amount of pollution that enters their local streams.
During the 2015-2016 school year, three Prince George’s County public high schools participated in ICPRB’s Score Four: Students, Schools, Streams, and the Bay program, led by ICPRB educators Rebecca Wolf and Nguyen Le. These schools included the Academy of Health Sciences at Prince George’s Community College in Largo, Northwestern High School in Hyattsville, and Parkdale High School in Riverdale. The Score Four program leads students through the process of exploring their watershed and assessing their school campus in order to develop a Stormwater Action Project aimed at reducing stormwater pollution to local streams.
Students began the year exploring their watershed by researching their local stream and learning about stormwater pollution sources and reduction methods. They were excited to discover that their local stream was within walking distance of campus and learned what they could do to improve its quality. During their research, they learned about the negative correlation between impervious surfaces and stream quality; the higher the amount of impervious surfaces, the lower the stream quality. Impervious surfaces do not allow water to infiltrate into the ground. Stormwater runs directly into storm drains, carrying trash and other pollutants into the stream or river, eventually making its way to Chesapeake Bay.
In the next phase of the program, the students assessed their campus by performing scientific inquiries to determine how their campus contributes to stormwater pollution. These inquiries helped students understand key concepts related to stormwater issues on their campus that would assist them in developing their project. They conducted a campus assessment to identify stormwater paths, problem areas, and possible locations for their project. They also investigated the permeability of the school grounds, as well as soil percolation and composition. With this data, the students determined their secondary project goals and project site, then selected native plants and created a design for their garden. Through this process, the students were able to tailor a project to their individual school campus.
At the Academy of Health Sciences, social studies teacher Carmen Wright and biology teacher Apollo Cordon, envisioned installing a conservation landscape on campus. A conservation landscape reduces stormwater runoff while beautifying the campus and attracting wildlife, such as beneficial insects and butterflies. After performing research, collecting data, and selecting plants, the students used their creativity and math skills to develop potential designs for their garden. Teams of students created 30 potential designs. The students presented their designs to their classmates and used a scoring rubric to judge each design, with the highest scoring design from each class entered into a design contest. Students then voted for the winning design. The final design for their garden centered on an eastern redbud tree as the focal point surrounded by butterfly milkweeds, New England asters, black-eyed Susans, and Joe-Pye weeds, totaling more than 60 plants. Bright orange blooms of butterfly milkweeds with plentiful monarch butterfly caterpillars greeted the students upon their return this fall.
Kari Rowe, an ESOL (English for Speakers of Other Languages) teacher from Northwestern High School, also envisioned a conservation landscape on campus. In the beginning of the program, it was difficult for the students to fully understand the concepts. However, despite the language barrier, the program was able to be adapted with guidance from Ms. Rowe. By the end, the students displayed their understanding and confidence through the success of their garden. The students designed the garden in a classic “bean” shape, planting more than 60 shrubs and perennials. The garden transformed the area with beautiful blooms of blazing stars, black-eyed Susans, and vibrant purple berries on their beautyberry bush.
Environmental science teacher Malka Ostchega had different visions for her students at Parkdale High School. She envisioned installing the beginnings of a food forest on campus that would continually develop throughout the years. Her students researched edible native plants that would meet their site conditions. They planted more than 70 trees and shrubs, ranging from persimmon trees to blackberry bushes to blueberry bushes, on a large hill near the entrance of the school. By selecting to plant on the hill, the food forest is optimally placed to reduce runoff.
At the conclusion of the program, the students celebrated their efforts and their gardens, taking great pride in what they accomplished. One student described how she valued implementing a project to address the problem of stormwater pollution instead of just vaguely talking about how we can help the environment. The students became environmentally knowledgeable and felt driven to continue to make a difference in protecting the valuable assets of Maryland’s landscape.
The success of this program was dependent on the cooperation, hard work, and dedication of the students, teachers, partners, and sponsors. Thank you to the Prince George’s County Department of the Environment and Chesapeake Bay Trust for providing funding through the Prince George’s County Stormwater Stewardship grant program.
You can watch a VIDEO on the Parkdale High School students journey through the Score Four program.
A Comprehensive Plan for the Future of the Potomac River Basin
Over the years, the Interstate Commission on the Potomac River Basin (ICPRB) has been involved in helping the Potomac jurisdictions in creating water resources plans and policies that attempt to meet the demands of the many users of water resources in the basin. Drinking water supply, wastewater treatment, recreation, industrial use, cooling water for power plants, and other uses are all important to the region’s quality of life. These uses sometimes conflict with consequences for water availability and water quality.
Little Seneca Reservoir
Each jurisdiction has a resources plan that addresses issues within its boundaries, but they are not meant to consider the collective impacts on the entire watershed. This can cause conflicts between jurisdictions and degrade the overall quality and quantity of the basin’s shared water resources. The ICPRB is building on its previous work with the jurisdictions, water suppliers, federal agencies, and other basin stakeholders to create a Potomac basin comprehensive water resources plan. The plan also will be adaptive so that changes can be incorporated based on what is learned through existing policies and new research. The plan should be completed in 2018.
The Potomac jurisdictions’ plans all have concerns in common. Those commonalities served as a starting point to identify issues for a basin-wide plan that builds on the similarities and seeks to address areas that are of basin-wide or interstate significance. In this way, a basin comprehensive plan can assist the jurisdictions in acknowledging their shared resources and guide them in strengthening their plans.
Assessing the facets of existing plans and the challenges that each jurisdiction faces was an important first step. That initial effort is being reviewed by a newly created advisory committee consisting of a wide range of stakeholders from all parts of the basin. This group will assist during each phase of the plan’s development. Their input will help guide an assessment of the basin’s water resources challenges, identification of practical, implementable solutions, preparation of a plan document, and review and revision of the plan for successful implementation. More than 47 challenges in 10 topic areas were identified, including climate change, ecological health, floods/droughts, land use change, and source water protection.
Many other stakeholders, while not on the committee, will receive regular updates and requests for feedback via an email distribution list. These two groups will provide diverse perspectives that can guide the developing plan. Currently, the advisory committee has 23 members, with another 130 on the email distribution list.
The advisory committee held its introductory meeting in September, guided by a facilitation team hired for the project, Policy Works LLC. Facilitator Kristin Rowles ran through the project timeline, and stressed that the plan was focused on seeking consensus where possible, and that reporting on different perspectives will be crucial.
Little Seneca Reservoir holds several wetlands, trails, and other amenities. It is a good example of the many things for which we rely on the Potomac and its resources.
The committee also discussed some stakeholder interest areas that should be better represented, and added additional areas of concern that should be addressed by the plan. The committee also reviewed their initial input into a project vision statement and broke into small groups to identify a vision of desired conditions in 50 years and the role the comprehensive plan can play in meeting those goals.
The process is off to a good start, with an energized advisory committee and a general agreement that this planning process can provide valuable assistance for the region’s waters in sustainably meeting the many current and future demands on the resource.
With the assistance of the stakeholders, ICPRB is now in the process of finalizing the list of challenges and beginning to develop recommendations to be refined by the stakeholders groups. The plan document will then be written and reviewed.
How the plan will finally be used will largely be up to the jurisdictions and agencies of the watershed, which can benefit from a basin-focused plan that identifies common problems and solutions, as well as reducing the chance for interstate resources conflicts.
Unlike many studies that do little more than collect dust on a shelf, the basin comprehensive plan has from its inception been designed to be inclusive and transparent. Its potential users have been a part of the process, and will more likely be motivated to use the recommendations that they helped develop.
“The comprehensive plan will serve as a roadmap to a sustainable future,” said ICPRB Executive Director Carlton Haywood. “Handing healthy, useful rivers and streams to future generations is one of the highest callings of the Commission,” he said.
Want to learn more or be added to the email distribution list? Visit our website, or contact us with additional questions.
Festival del Río Anacostia
When it comes to learning about local environmental issues it is important that everybody has a seat at the table (or on the boat). That was the thought behind the recent Festival del Río Anacostia held on October 15, 2016, at Bladensburg Waterfront Park in Bladensburg, Md. The riverfest with a Latin twist brought 200-300 watershed residents to the park, where local watershed groups, including the Interstate Commission on the Potomac River Basin, discussed river health, pollution, fishing, and more with the largely Spanish-speaking attendees.
“The Festival organizers wanted a fun environmental event that would be language- and family-friendly for the many Latino residents of the Anacostia watershed. Our overall goals were to inform Latino communities of environmental issues that affect their lives, of outdoor recreation opportunities, and to involve them in the protection of the watershed,” noted Rebecca Wolf of the Interstate Commission on the Potomac River Basin, one of the organizers of the event.
Dedicated to connecting the Latin community to the Anacostia, each organization had a Spanish-speaking attendant to help with translations and explanations. Free fishing lessons and boat-rides let people experience the sights, sounds, and smells of the river. Each booth had an activity for the young attendees, Marimba dancers entertained the crowd, and many enjoyed tacos and pupusas while perusing the booths.
It is no secret that the Anacostia River has struggled with the effects of urbanization. It is one of the most densely populated watersheds within the Chesapeake Bay region. The high population upstream has contributed to stormwater runoff, trash, and other pollutants in the waterway east of the Nation’s Capital. However, recent years have seen much improvement. Local non-profits and government organizations have worked to increase aquatic vegetation, clean up trash, and institute other restoration efforts as well as increase recreation opportunities for those that live within its watershed.
The first annual event was declared a success by all. Mark your calendars for Festival del Río Anacostia, 2017 on October 15. “After the success of this year’s pilot festival, the event organizers plan for a bigger festival next year,” said Wolf.
ICPRB would like to thank all the organizations and the volunteers that made the Festival del Río Anacostia a success.
Watching the River Flow
The Potomac has always been known as a “flashy” river, with high and low river flows that sometimes are only a few days apart. It earned its title this spring and summer. There was plenty of precipitation during the summer, although the region did not get the massive storms that cause serious flooding. From March through October, the highest daily flow measured at Little Falls gage (which captures flow in the basin upstream of Washington, D.C.) was about 20.9 billion gallons per day on May 8, 2016. The gage recorded a low of about 565 million gallons per day on September 19. Average annual flow of the river is about 7 billion gallons per day. Flows are tracked by the U.S. Geological Survey at gage stations around the watershed. During that time, flows rose and fell frequently from May through August.In the tidal Potomac, there were reports of remarkable water clarity in some areas, although the river as a whole looked fairly normal. The frequent rains also limited sunlight, and submerged vegetation in the river got off to a very slow start in the spring, but quickly recovered to normal or above-normal levels.
The mouth of the Potomac is near the southern end of the annual “dead zone” of low-oxygen (hypoxic) water that infests part of the Chesapeake’s bottom each summer. The Potomac has its own warm-weather hypoxic zone that is present at the mouth and can extend up toward the Route 301 Bridge in bad summers. Like the bay, the lower Potomac’s zone was about normal for the year after bouncing around the median. Bottom dissolved oxygen near the river’s mouth approaches zero in many years.
When an extended dry spell gripped the basin in September, river levels fell to a point where the ICPRB Section for Cooperative Water Supply Operation on the Potomac (CO-OP) began daily monitoring of river levels, water supply utility demands and precipitation. The daily status monitoring allows a smooth transition into drought operations, if needed. In a strong drought, CO-OP works with the utilities to guide their use of water sources and to request releases of stored water from the Jennings Randolph Reservoir, more than 100 miles upstream. Daily monitoring occurred during the month of September. River levels rose in early October, but monitoring began again on October 24, and has been ongoing. Water usage drops strongly in the fall (after people stop watering lawns and gardens) and even with continued dry weather the probability of a water release is very small.
The Audrey Carroll Audubon Sanctuary is just that, a sanctuary. Outside the hustle and bustle of city life, it is a quiet retreat
Common Yellowthroat
that encourages contemplation and introspection. Maintained by the Audubon Society of Central Maryland (ASCM) and located at 13030 Old Annapolis Rd, outside of Frederick, Maryland, the 129-acre sanctuary is host to a wide variety of birds, from the dainty Common Yellowthroats and Eastern Bluebirds to formidable raptors. Several birdhouses jut up from an expansive
Viewing Platform
meadow along the main trail. A leisurely walk along the well-maintained paths will lead to a platform that looks over the entire valley, an ideal spot for wildlife watching. A pond lies just below the platform.
The park is open for light recreation. Biking or jogging are not allowed but walking, bird-watching, and wildlife education are encouraged. Just a short walk from the parking lot gives you an excellent view of the surrounding valley.
The ASCM holds guided nature walks one day a month that are free and appropriate for all ages. Each walk is guided by a trip leader and has a seasonal theme, such as bird migration and butterfly identification.
Check out the Sanctuary this weekend for a relaxing trek among the woods and meadows or join them on August 20 for their next nature walk focused on summer wildlife.
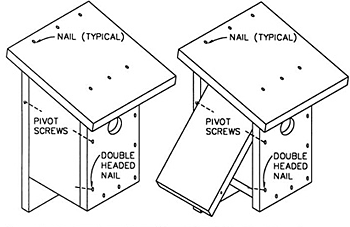
Every year, many birds create their own nests in which to lay their eggs and raise their chicks. Some birds and mammals, however prefer nesting in cavities in decayed trees or stumps and depend on other animals, such as
woodpeckers, or mother nature to create these cavities for them. But human activities such as logging, agriculture, and development have left many species out in the cold. For instance, some of our most enchanting owls — including saw-whet, spotted, screech, barred, boreal, and northern pygmy owls, are having a hard time finding shelter in communities across the country.
A nest box is a man-made nest for cavity-nesting bird species. There are more than two dozen cavity nesting species in the United States. Each nest box is created and placed specifically with the needs and comfort of a different species in mind.
Why Should I Create a Nesting Box?
There’s a serious shortage of accommodations in the bird world these days. It is getting harder for bird species that nest in natural cavities such as holes in decaying trees and stumps to find lodgings. Some species’ populations have declined seriously because of the dwindling number of natural cavities available to them.
Nesting boxes are a real bonus for birds that raise their young in cavities. Many of these species settle comfortably into human-made dwellings. By creating and placing appropriate nesting boxes we can make a difference in the local population of bird species. An example of a comeback is the eastern bluebird, a species that was in serious decline due to the dwindling number of natural cavities available to them. The species has since rebounded because of nesting box programs organized throughout their range.
Developing Your Goals and Budget
Creating a nest box is not very expensive, however the costs can add up if you are trying to create many of them! Your goals for creating nest boxes will in part determine the costs of their creation.
Goals
You may be building nest boxes just for the members of your organization, or for a local park, or you may be targeting a particular species whose population has dropped precipitously, or you may be reaching out to a specific audience such as schools in your watershed. Whatever the case, you will want to write out your specific goals and let them guide your work plan.
Some example goals:
Increase the population of a specific bird species that historically nested in your watershed or community
Enhance community awareness of habitat decline due to increased human activity and presence in the area
Foster environmental stewardship and an interest in science by students, teachers, administrators, and members of the community
Cost
The cost of creating a nest boxes is quite low. In fact the cost of the tools needed to create a nest box is greater than the cost of a nest box itself. If you are building one bird box, a hand saw, around twenty screws or nails (or wood glue), about ten square feet of 1” thick lumber and a drill with an appropriate sized hole-coring bit will be necessary. If you are building several nest boxes, you will probably want to use a circular saw instead of a hand saw.
The cost of materials for a bird box can vary between under a dollar (scrap lumber and a few screws or nails) to a few dollars (new lumber). The cost of tools could be upwards of $250.00 depending on the tools you decide to purchase.
Financing
There are many ways to finance a bird box project. The simplest method of cost cutting is to cut material costs by using leftover lumber. You can also partner with a lumber yard to get new or scrap lumber donated.
As previously noted, tools are the primary cost of building nest boxes. You can cut these costs by asking members of your organization or friends to lend you their tools for the project. You can also ask your local high school wood shop class if they would be willing to donate their time to help cut lumber to prepare the bird boxes.
If you are in need of funding for your project, you can also ask the recipients of the nest boxes to make a donation or you can seek out grants. The Home Depot and Walmart offer grants for community environmental projects such as these. You might also try the Chesapeake Bay Trust (MD) and the Chesapeake Bay Restoration Fund (VA) or other environmental grant making organizations in your jurisdiction.
Nest Box Project Timeline
Below is a sample timeline for a nest box project where individuals will be building their own boxes and the materials and tools will be provided by your organization:
Determine the target area for the nest boxes based on species need
Order materials from supplier
Arrange for a location to store and build the nest boxes
Arrange for materials to be delivered or to pick up the materials (NOTE: this may be an additional cost)
Purchase or arrange to borrow needed tools
Advertise the nest box construction day through as many outlets as possible
Create and print steward’s manual/educational materials
Host nest box construction day
Arrange site visits to make sure that the nest boxes are properly installed and/or to help install them
Call nest box stewards to remind them to clean out their nest boxes after the nesting season
Advertising your Nest Box Project
There are lots of ways to advertise for an event and, unfortunately, no one way works consistently. Here are several options for you to choose from. The best outreach campaigns make use of several techniques and only you can know what is best for your project. Advertising options include:
Creating and distributing door hangers to target a specific neighborhood where you would like to work
Creating and distributing a press release to your local paper, radio stations and/or television stations (see the Resources section for information on how to write and distribute a press release).
Creating flyers and placing them in public libraries, recreation centers, outdoor stores, and walking trails
Developing a web site and using social media such as Facebook and Twitter
Running an advertisement in a local paper, or on radio stations and/or television stations
Discussing the event at a targeted community association, church group, youth group, and/or service organization meeting
Advertising your event on free on-line environmental calendars such as the Chesapeake Network
Sending out an email to people you think would be interested and asking them to tell their friends as well
Sending out a mass mailing to your targeted audience
Organizing a Nest Box Construction and/or Distribution Day
It is not enough to have the construction materials for your nest boxes ready for your event—some final preparations need to be made to make your construction/distribution day a success.
Construction
In advance of your event make sure that you have:
Enough tools to share among participants without creating long waits
Refreshments and snacks if possible or at least provide water
Created and printed a sign-in sheet
Created and printed enough directions for constructing the nest boxes if possible with diagrams
Created a pre-constructed nest box for demonstration purposes
Done as much prep work for each nest box as is possible—for example, put all the parts together with each nest box or pre-cut the wood for the box
Called key volunteers and asked them to arrive early and be Team Leaders
Organized stations or groups so that volunteers can be teamed up with Team Leaders to assemble their nest boxes
Put together an emergency medical kit and set up an emergency plan in case of an accident
Made sure that bathroom facilities are available for volunteers
Contacted local newspapers
Designated a volunteer to take photos of the event
Distribution
It is not enough to give out the completed nest boxes and assume that they have been installed correctly. In advance of your event make sure to:
Create or set aside a nest box to demonstrate proper installation
Find the proper habitat near your distribution site where you can demonstrate installation
Prepare the installation site so that the demonstration will go quickly and smoothly
Create and print instructions for installing the nest box if possible with diagrams
Recruit volunteers to visit homes to help install the nest boxes and/or to make sure that nest boxes are properly installed
Creating a Nesting Box
There are several steps to constructing a nest box from scratch. Ideally, the first three steps below would be completed before the volunteers assemble the nest boxes in order to save time and to minimize the number of people using potentially dangerous tools.
Materials
Of all the available building materials, wood is about as good as you can get. It’s durable, has good insulating qualities, and it breathes. Three-quarter to one-inch-thick bald-cypress and red cedar are recommended. You can use any wood that resists weathering. Pine and exterior grade plywood will do, but they’re not as durable. Softwoods, particularly pines, are easy to work with. Avoid hard-woods, poplar, and basswood as they weather poorly. It makes no difference whether the wood is slab, rough-cut or finished, as long as the inside has not been treated with stains or preservatives. Fumes from the chemicals could harm the birds.
There’s no need to paint cypress and cedar, but pine and plywood houses will last longer with a coat of water based exterior latex paint. White is the color for purple martin houses. Tan, gray, or dull green works best for the other cavity nesting species. The dull, light colors reflect heat and are less conspicuous to predators. Don’t paint the inside of the box or the entrance hole. Regardless of which wood you select, gluing all the joints before you screw them together will extend the life of your bird house. Galvanized or brass hinges and screws resist rusting and hold boxes together more tightly as they age.
Tools
Hand saw or circular saw
Hand Drill
Screwdriver or screwdriver drill bit
Hole coring drill bits (size will vary depending on the next boxes intended species)
Design
How elaborate you make your bird house depends on your personal sense of aesthetics. For the most part, all the birds care about is their safety and the right dimensions: box height, depth and floor, diameter of entrance hole, and height of hole above the box floor. Refer to the following chart, keeping in mind that birds make their own choices, without regard for charts. So don’t be surprised when you find tenants you never expected in a house you intended for someone else. Here is an example of an Eastern Bluebird box design (as seen on this page).
Nest Box Dimensions
Species
Box Floor (in.)
Box Height (in.)
Entrance Height (in.)
Entrance Diameter (in.)
Placement Height (ft.)
American Robin*
7×8
8
—
—
6-15
Eastern Bluebird
5×5
8-12
6-10
1-1/2
4-6
Western & Mountain
Bluebird
5×5
8-12
6-10
1-9/16
4-6
Chickadees
4×4
8-10
6-8
1-1/8
4-15
Titmice
4×4
10-12
6-10
1-1/4
5-15
Ash-throated Flycatcher
6×6
8-12
6-10
1-1/2
5-15
Great Crested Flycatcher
6×6
8-12
6-10
1-3/4
5-15
Phoebes*
6×6
6
—
—
8-12
Brown-headed Pygmy and Red-breasted
Nuthatch
4×4
8-10
6-8
1-1/4
5-15
White- breasted Nuthatch
4×4
8-10
6-8
1-3/8
5-15
Prothonotary Warbler
5×5
6
4-5
1-1/8
4-8
Barn Swallow*
6×6
6
—
—
8-12
Purple Martin
6×6
6
1-2
2-1/4
6-20
Tree and Violet-Green
Swallows
5×5
6-8
4-6
1-1/2
5-15
Downy Woodpecker
4×4
8-10
6-8
1-1/4
5-15
Hairy Woodpecker
6×6
12-15
9-12
1-1/2
8-20
Lewis’s Woodpecker
7×7
16-18
14-16
2-1/2
12-20
Northern Flicker
7×7
16-18
14-16
2-1/2
6-20
Pileated Woodpecker
8×8
16-24
12-20
3×4
15-25
Red-Headed Woodpecker
6×6
12-15
9-12
2
10-20
Yellow- bellied Sapsucker
5×5
12-15
9-12
1-1/2
10-20
Bewick’s and House wrens
4×4
6-8
4-6
1-1/4
5-10
Barn Owls
4×4
6-8
4-6
1-1/2
5-10
Screech Owls and Kestrel
8×8
12-15
9-12
3
10-30
Wood Ducks
10×18
10-24
12-16
4
10-20
Red-tailed Hawk and
Great Horned Owl
24×24 platform
Osprey
48×48 platform
*Use nesting shelf, platform with three sides and an open front
Step 1 – Mark and Cut the nest box floor and sides.
Using a piece of cardboard or paper as a template for size, mark the wood with the dimensions for the nest box you are building
Using a hand saw or a circular saw, cut the wood where marked
Step 2 – Mark and Cut the Entrance Hole
Using a template for size, mark the wood with a hole appropriate for the species of bird you are trying to attract. Make sure that the nest hole is located in the appropriate place
Depending on the type of species you are attracting, you can use a drill bit to drill the exact size hole. If you are building a box for a species that needs a large or unusual shaped hole, pre-drill a small hole using ½” spade bit. This hole is the starting point of your jigsaw to cut the large hole
Use the jigsaw to cut out your hole
Step 3 – Mark and Drill Drain Holes
Mark four or five spots on the base of the nest box to drill drain holes. If you are doing four holes, place them about an inch from each corner. If you add a fifth hole, place it in the center of the base.
Using a quarter inch drill bit, drill holes in the locations that you marked.
Step 4 – Screw or nail together the box
Use a wood glue to place together the boxes panels (except the hinged top or side entrance)
While the wood glue is drying, nail or screw together the panels so that the sides make a tight fit
Attach the hinged panel with screws or nails
Step 5 – Paint or stain your box (if necessary)
If you paint your box, use subdued brown, tan, or gray, as birds are more likely to be attracted to these colors
Do not paint or stain the inside of your box!
Additional Suggestions for Creating your Nest Box
Drainage
Water becomes a problem when it sits in the bottom of a bird house. A roof with sufficient slope and overhang offers some protection. Drilling the entrance hole on an upward slant may also help keep the water out
Regardless of design, driving rain will get in through the entrance hole. You can assure proper drainage by cutting away the corners of the box floor and by drilling 1/4 inch holes in the box floor. Nest boxes will last longer if the floors are recessed about 1/4 inch
Entrance Hole and Interior
Make the surface of your entrance hole rough. A rough surface both inside and out makes it easier for the adults to get into the box and, when it’s time, for the nestlings to climb out. If your box is made of finished wood, add a couple of grooves outside below the hole
Add grooves, cleats or wire mesh inside the front panel
Other Thoughts
Create a hinged roof or side panel on the box so that you can clean out the nest box at the end of the nesting season
Don’t attach a platform or perch outside the box! Perches give predators an easy way to raid the nest
Without air vents, boxes can turn into bird ovens. There are two ways to provide ventilation: leave gaps between the roof and sides of the box, or drill 1/4″ holes just below the roof
Don’t be tempted by those beautiful duplexes or houses that have more than one entrance hole. With the exception of purple martins, cavity-nesting birds prefer not to share a house. While these condos look great in your yard, starlings and house sparrows are the only birds inclined to use them
Installing Your Nest Box
The installation process is just as important as the construction process. A nest box can be solidly constructed, but it will not attract the bird species that you desire if it is not properly located and installed. In fact, an improperly placed box may attract undesirable species and may actually help drive away the birds you are trying to attract.
Where you put your bird house is as important as its design and construction. Cavity nesting birds are very particular about where they live. No matter how perfect your nest box, if you don’t have the right habitat, the birds aren’t likely to find it. Not everyone has the habitat for a wood duck, purple martin, or screech owl. On the other hand, just about anyone can attract a robin, titmouse, wren, or chickadee.
Let’s assume you’ve built or bought the “perfect” house. You put it out in your backyard in February. Months pass, and not one bird has landed on it. What’s wrong? It may be that you don’t have the right habitat, or it may be where you put the house. There’s lots you can do to modify your land to attract the birds you want to see. It can be as simple as putting out a bird bath or as complicated as planting fruit-bearing shrubs or installing a pond with a waterfall. But it’s much easier just to identify the birds most likely to take to your backyard as it is and put the appropriate nest box in the right place.
Should you hang it from a tree limb, nail it to a fence, or mount it on a pole or a tree trunk? There’s a wide range between how high and low you can place a nest box. Pick a height that’s convenient for you. After all, you’ll want to watch what goes on and keep the box clean. If you want to watch chickadees from your second floor window or deck, fifteen feet is not unreasonable but it’s a lot easier to clean out a box at eye level.
Here are some tips on where to put bird houses:
Houses mounted on metal poles are less vulnerable to predators than houses nailed to tree trunks or hung from tree limbs.
Use no more than four small nest boxes for any one species or one large box per acre.
Put about 100 yards between bluebird boxes and 75 yards between swallow boxes (if you have both species, “pair” the houses with one bluebird box 25 feet from a swallow box. Put the “pair” 100 yards away.)
Don’t put bird houses near bird feeders.
Don’t put more than one box in a tree, unless the tree is extremely large or the boxes are for different species.
If you have very hot summers, face the entrance holes of your boxes north or east to avoid overheating the box.
Cover the entrance until it’s nesting time for the birds you hope to attract. Starlings and sparrows nest early and frequently take over boxes intended for other birds. They are also partly responsible for the decline of many cavity-nesting birds.
Don’t put nesting materials inside the box — birds would much rather find their own. But you can help out by making materials available outside.
The box will more likely be used if it’s placed on a pole, mounted on a tree-trunk, or suspended from a branch with a hook screwed into the roof.
Pick a spot that’s sunny at least part of the day. Turn the entrance away from the usual direction of wind and rain — birds don’t want a storm in their living-room!
Maintaining Your Nest Box
Maintaining a nest box is easy! The most important thing to remember to keep your nest box in good shape is to empty the nest box at the end of the nesting season. Cleaning the box thoroughly gets
rid of parasites that can actually weaken and kill nestlings. It’s a good idea to wear a face mask (available at hardware stores) to avoid breathing fungi and parasites. Scrub your box with a stiff brush and pour boiling water through it for disinfecting purposes.
For species like bluebirds, which sometimes nest twice in a summer, remember to houseclean between broods. Removing the first nest keeps adults from building another one on top of it. Otherwise, the new nest could be raised dangerously close to the entrance hole, making chicks easier prey for starlings or raccoons.
In addition nest boxes require some additional maintenance. Nest boxes should be inspected once a year (usually in the winter) and
Treat the nest box with a waterproof varnish if necessary
If the roof is loose, the bottom warped, or a side cracked, take it down for repairs.
If your box is not attracting birds (or it is attracting the wrong birds) you should consider relocating your box.
Check to make sure that the box is still securely mounted. A poorly mounted box could fall with birds inside injuring them!
Drill a few small holes on the sides of the box, just below the roof overhang to allow air and a little light to filter in. A few holes drilled in the floor near the walls will let moisture drain out.
Clean your Nest Box
Nest boxes should be easily accessible so you can see how your birds are doing and, when the time comes, clean out the house. Part of being a responsible nest box landlord is your willingness to watch out for your tenants. Monitor your nest box every week and evict unwanted creatures: house sparrows, starlings, rodents, snakes, and insects. Be careful when you inspect your bird boxes. You may find something other than a bird inside. Don’t be surprised to see squirrels, a mouse, a snake, or insects. Look for fleas, flies, mites, larvae, and lice in the bottom of the box.
Check your Nest Box
Watch the nest for awhile. If you don’t see or hear any birds, go over and tap on the box. If you hear bird sounds, open the top and take a quick peek inside. If everything’s okay, close the box. If you see problems (parasites or predators), remove them and close the box.
Here’s where a bird house with easy access makes the job simple. Most bird houses can be opened from the top, the side, the front, or the bottom. Boxes that open from the top and the front provide the easiest access. Opening the box from the top is less likely to disturb nesting birds. It’s impossible to open a box from the bottom without the nest falling out. While side- and front-opening boxes are convenient for cleaning and monitoring, they have one drawback: the nestlings may jump out. If this happens, don’t panic. Just pick them up and put them back in the nest. Don’t worry that the adults will reject the nestlings if you handle them. That’s a myth. Most birds have a terrible sense of smell.
If you clean out your nest boxes after each brood has fledged, several pairs may use the nest throughout the summer. Many cavity-nesting birds will not nest again in a box full of old nesting
Protecting your Nest Box from Predators
Cats—Nesting birds are very vulnerable to cats, as are fledglings and birds roosting for the night. Bell collars on cats offer birds little protection. Nailing a sheet metal guard or cone to a tree trunk is unsightly, but it may deter less agile felines. Houses mounted on metal poles are the most difficult for predators to reach, especially if you smear the poles with a petroleum jelly and hot pepper mixture.
Squirrels—Red squirrels, and sometimes gray squirrels, can become a serious menace to bird houses and the birds themselves. If you find your nest hole enlarged, chances are a red squirrel is the culprit. Once inside the box, squirrels make a meal of the eggs and young. Adding a predator guard of sheet metal to the entrance hole is usually enough to keep squirrels out.
Raccoons and Opossums—They will stick their arms inside nest boxes and try to pull out the adult, young, and eggs. Adding a predator guard to the bird house or to its pole support is a simple solution.
Snakes—Snakes are an important part of the natural balance between predator and prey. If you find one of these reptiles in your bird house, please don’t kill it. Snake-proof your house by putting it on a metal pole lathered with petroleum jelly and/or hot red cayenne pepper.
House Sparrows and Starlings—If you don’t discourage them, these two pest species, introduced from Europe, will bully or kill cavity-nesting birds. Since house sparrows and starlings are not protected by law, you may destroy their nests. But, remember, other birds are protected by law.
Insects—Many insects lay their eggs and pupate in bird houses. You should inspect your bird houses for signs of gypsy moths, blow flies, wasps, ants, gnats, and bees. You can keep bees and wasps from attaching their nests by coating the inside of the roof with bar soap. In areas where gypsy moths abound, avoid placing boxes in oak trees, which are favored by the gypsy moths.
Stay informed about the latest news, impactful projects, environmental challenges, and community initiatives in the Potomac River watershed—sign up today!
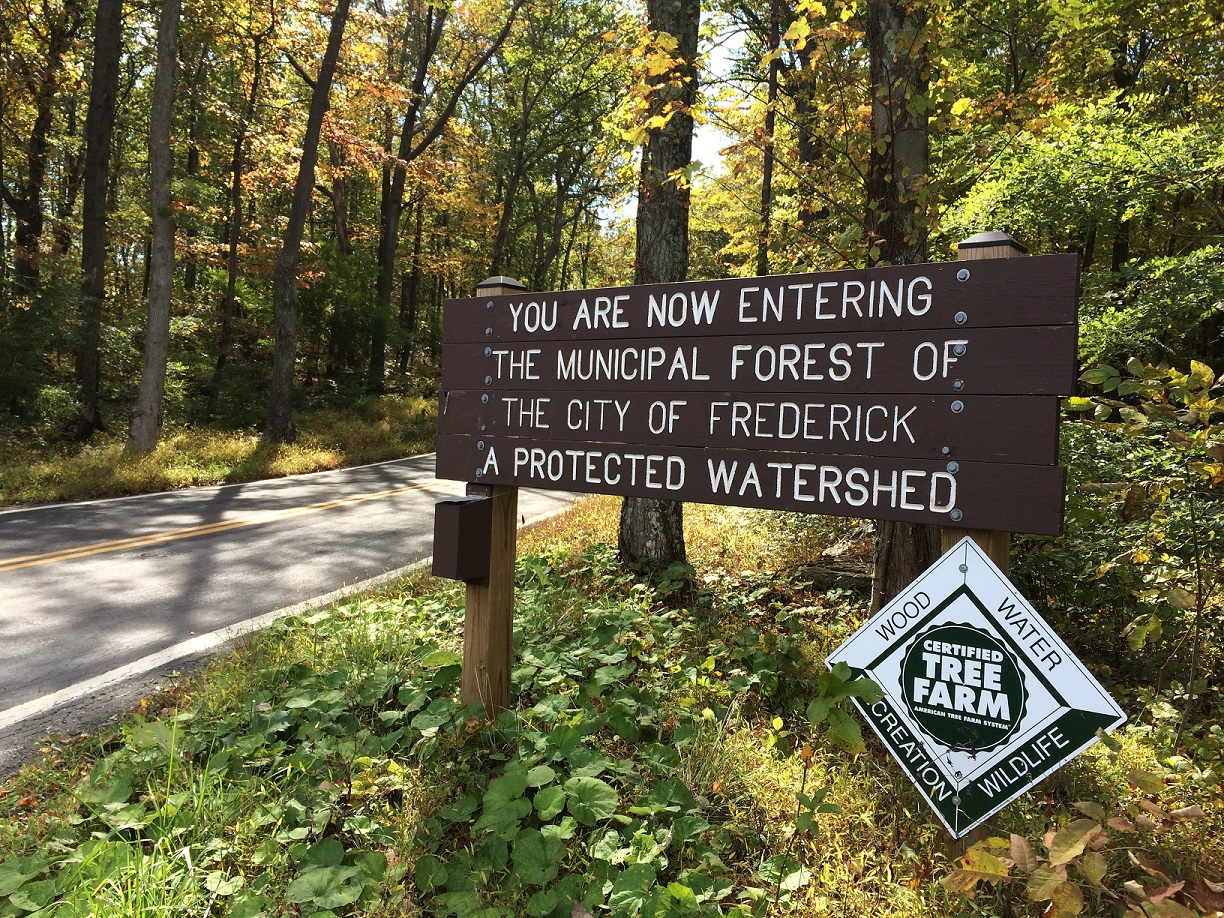 Located along the ridge of Catoctin Mountain in western Maryland, the forest is accessible off Gambrill Park Road. It is also a short drive from the charming town of Frederick, Maryland. Although camping is not allowed in the Frederick Municipal Forest, Gambrill State Park is just down the road and provides a variety camping options.
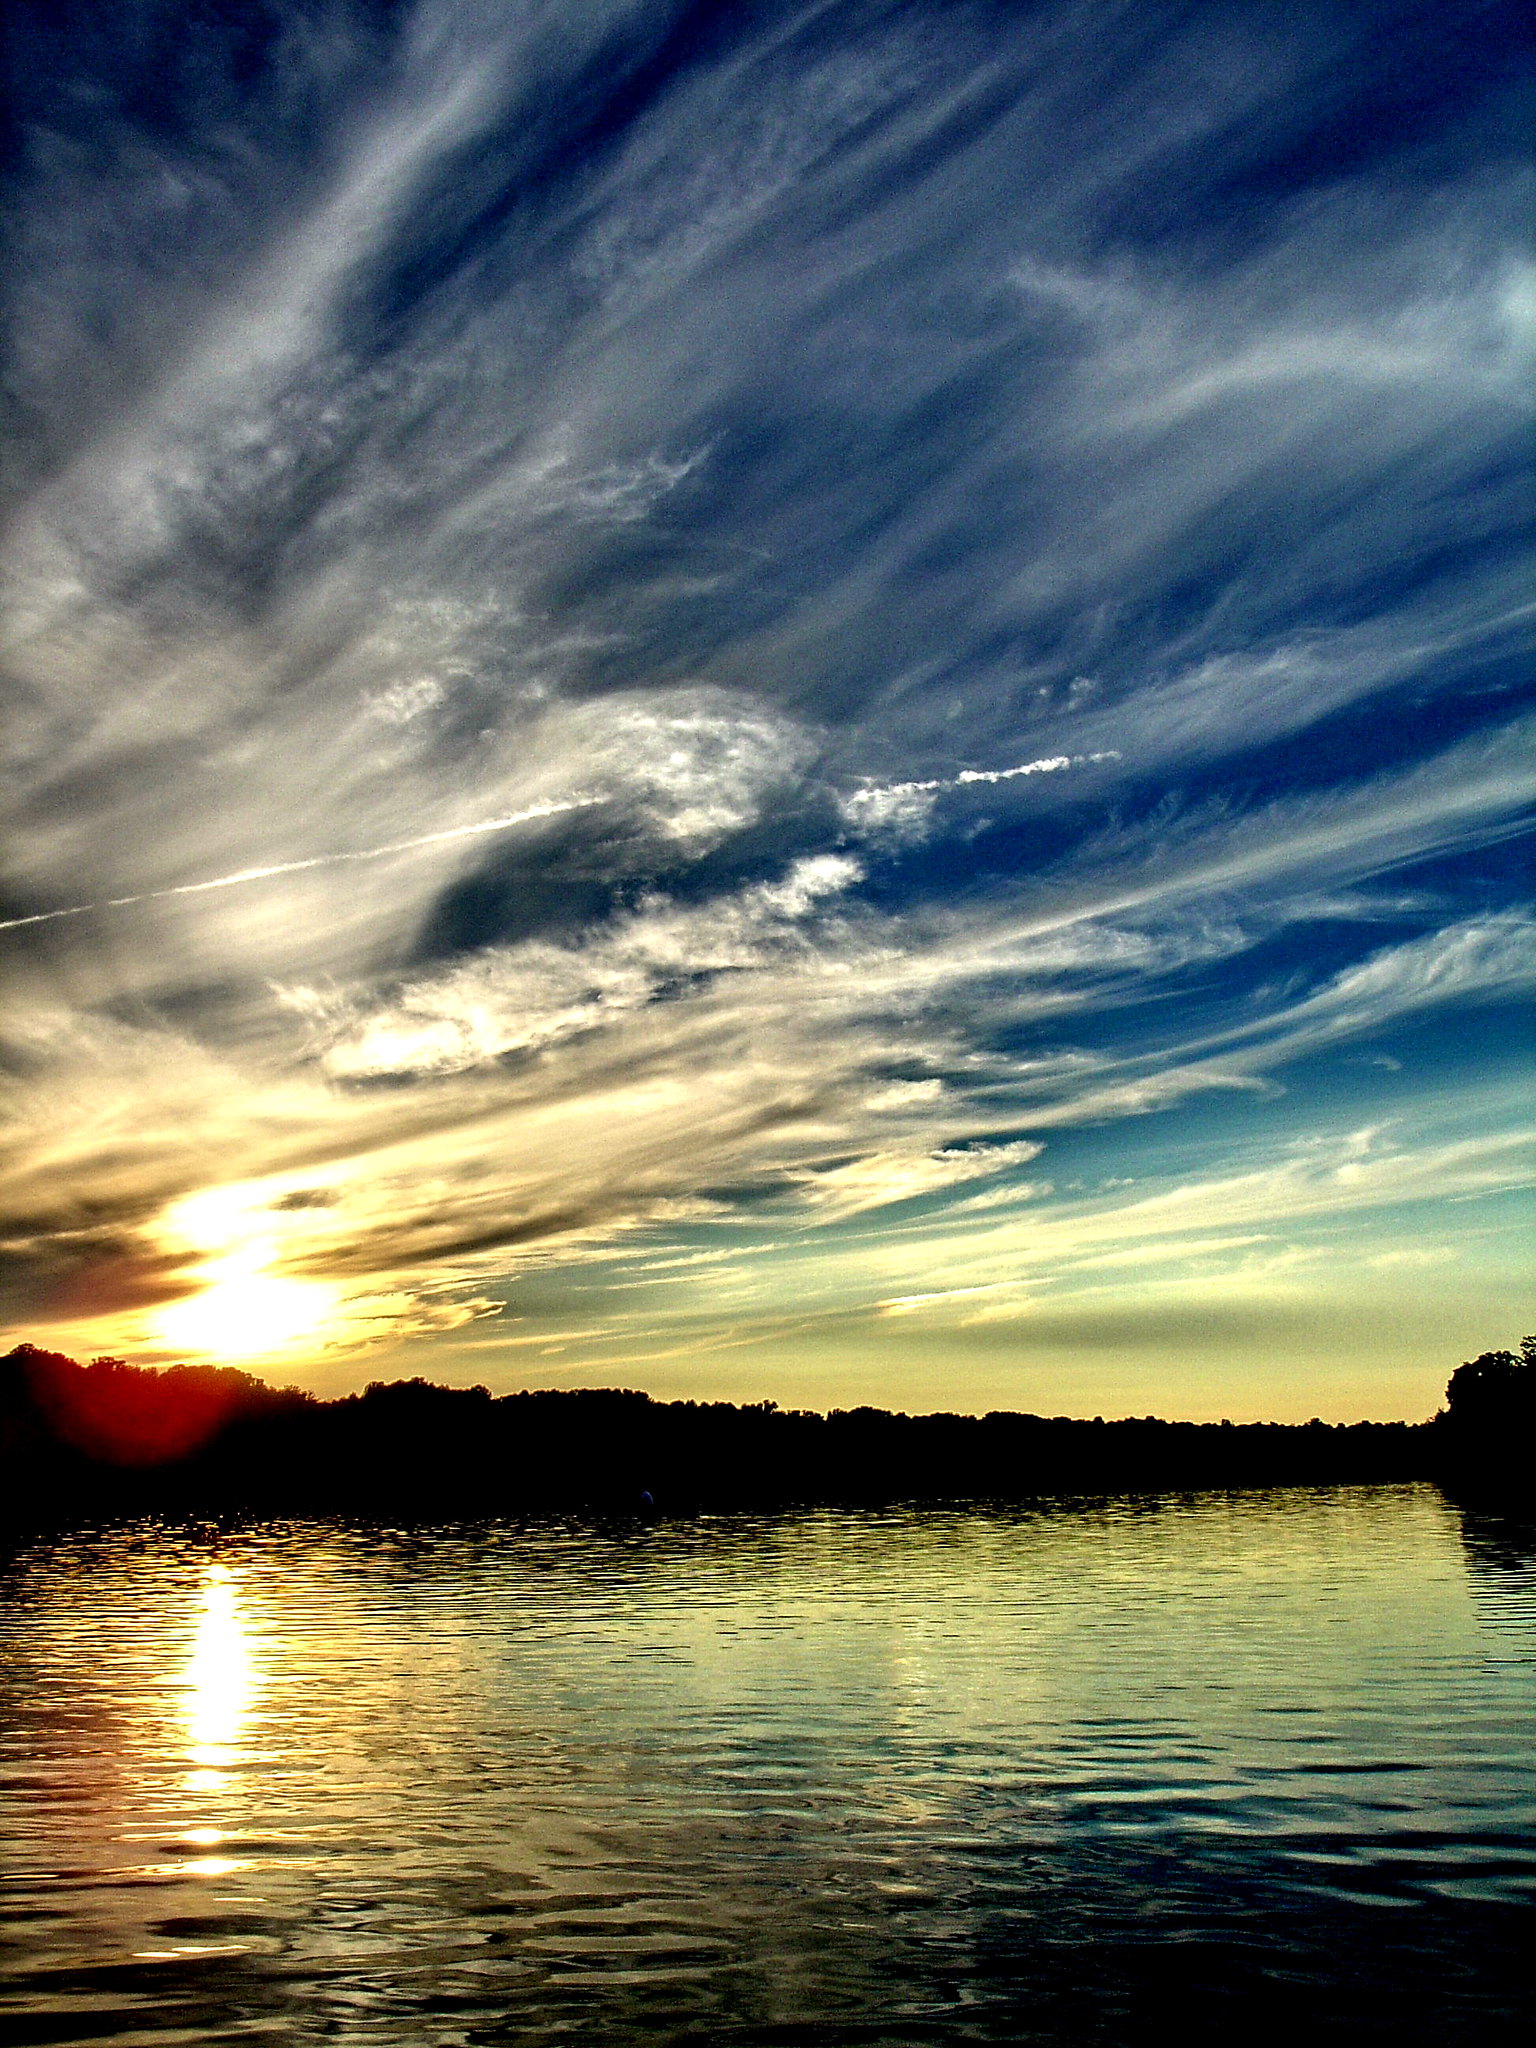


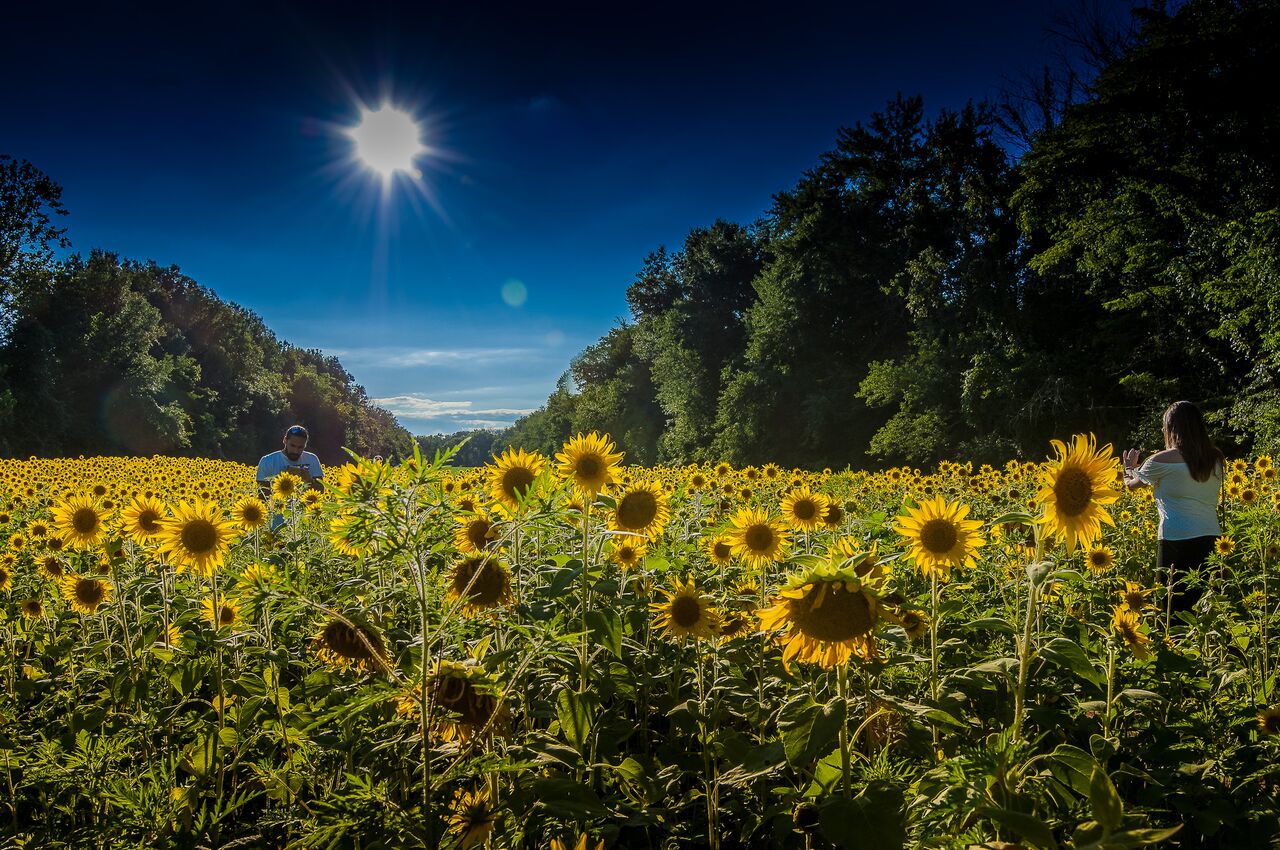


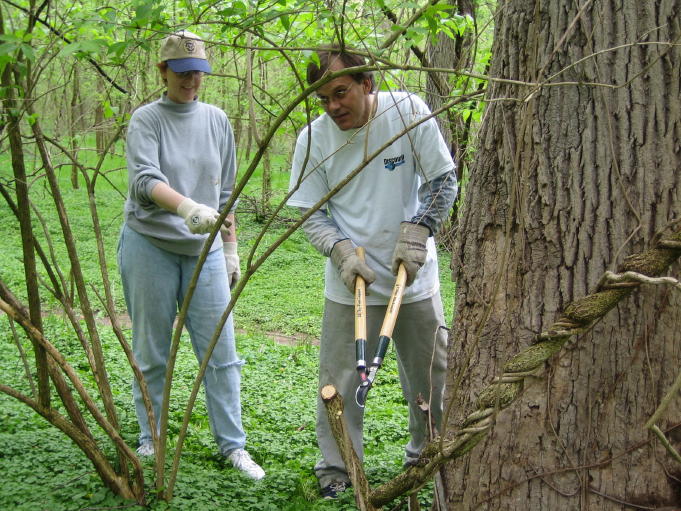
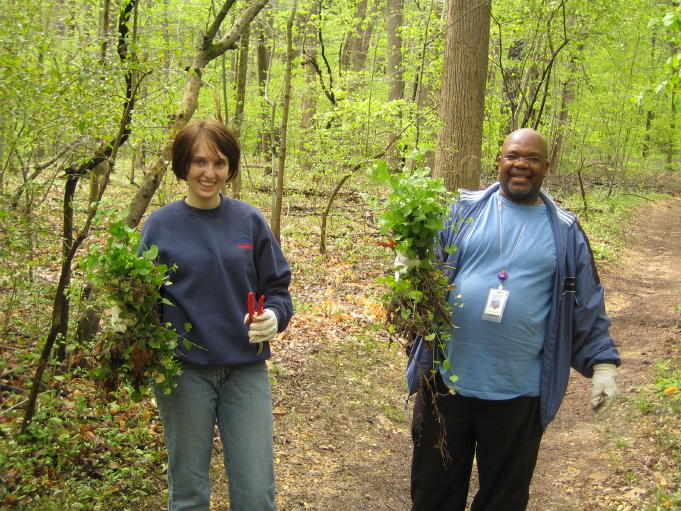

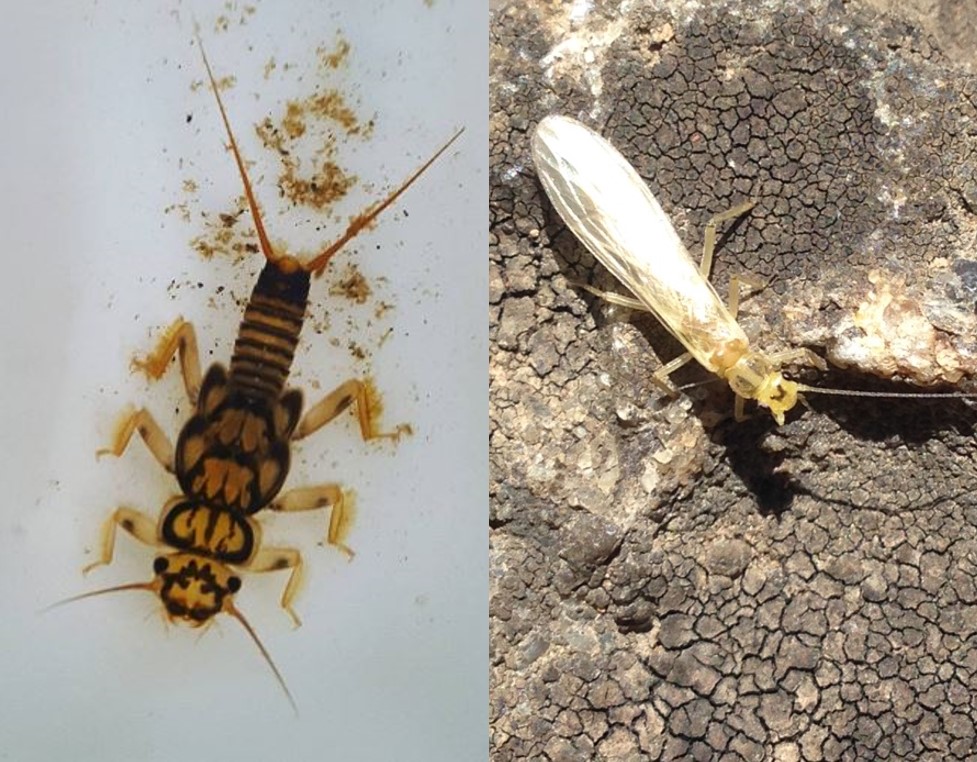
 Most streams have eroded stream banks, are polluted and filled with sediment and litter, and lack an abundance of wildlife. With 80 percent of our streams in poor or fair condition, we should all work to protect them and to improve their water quality. This past school year, students in Prince George’s County, Md. did just that. More than 400 students removed approximately 700 square feet of turf grass and replaced it with gardens containing more than 200 native trees and plants that increase infiltration and absorption of runoff, reducing the amount of pollution that enters their local streams.
 Kari Rowe, an ESOL (English for Speakers of Other Languages) teacher from Northwestern High School, also envisioned a conservation landscape on campus. In the beginning of the program, it was difficult for the students to fully understand the concepts. However, despite the language barrier, the program was able to be adapted with guidance from Ms. Rowe. By the end, the students displayed their understanding and confidence through the success of their garden. The students designed the garden in a classic “bean” shape, planting more than 60 shrubs and perennials. The garden transformed the area with beautiful blooms of blazing stars, black-eyed Susans, and vibrant purple berries on their beautyberry bush.


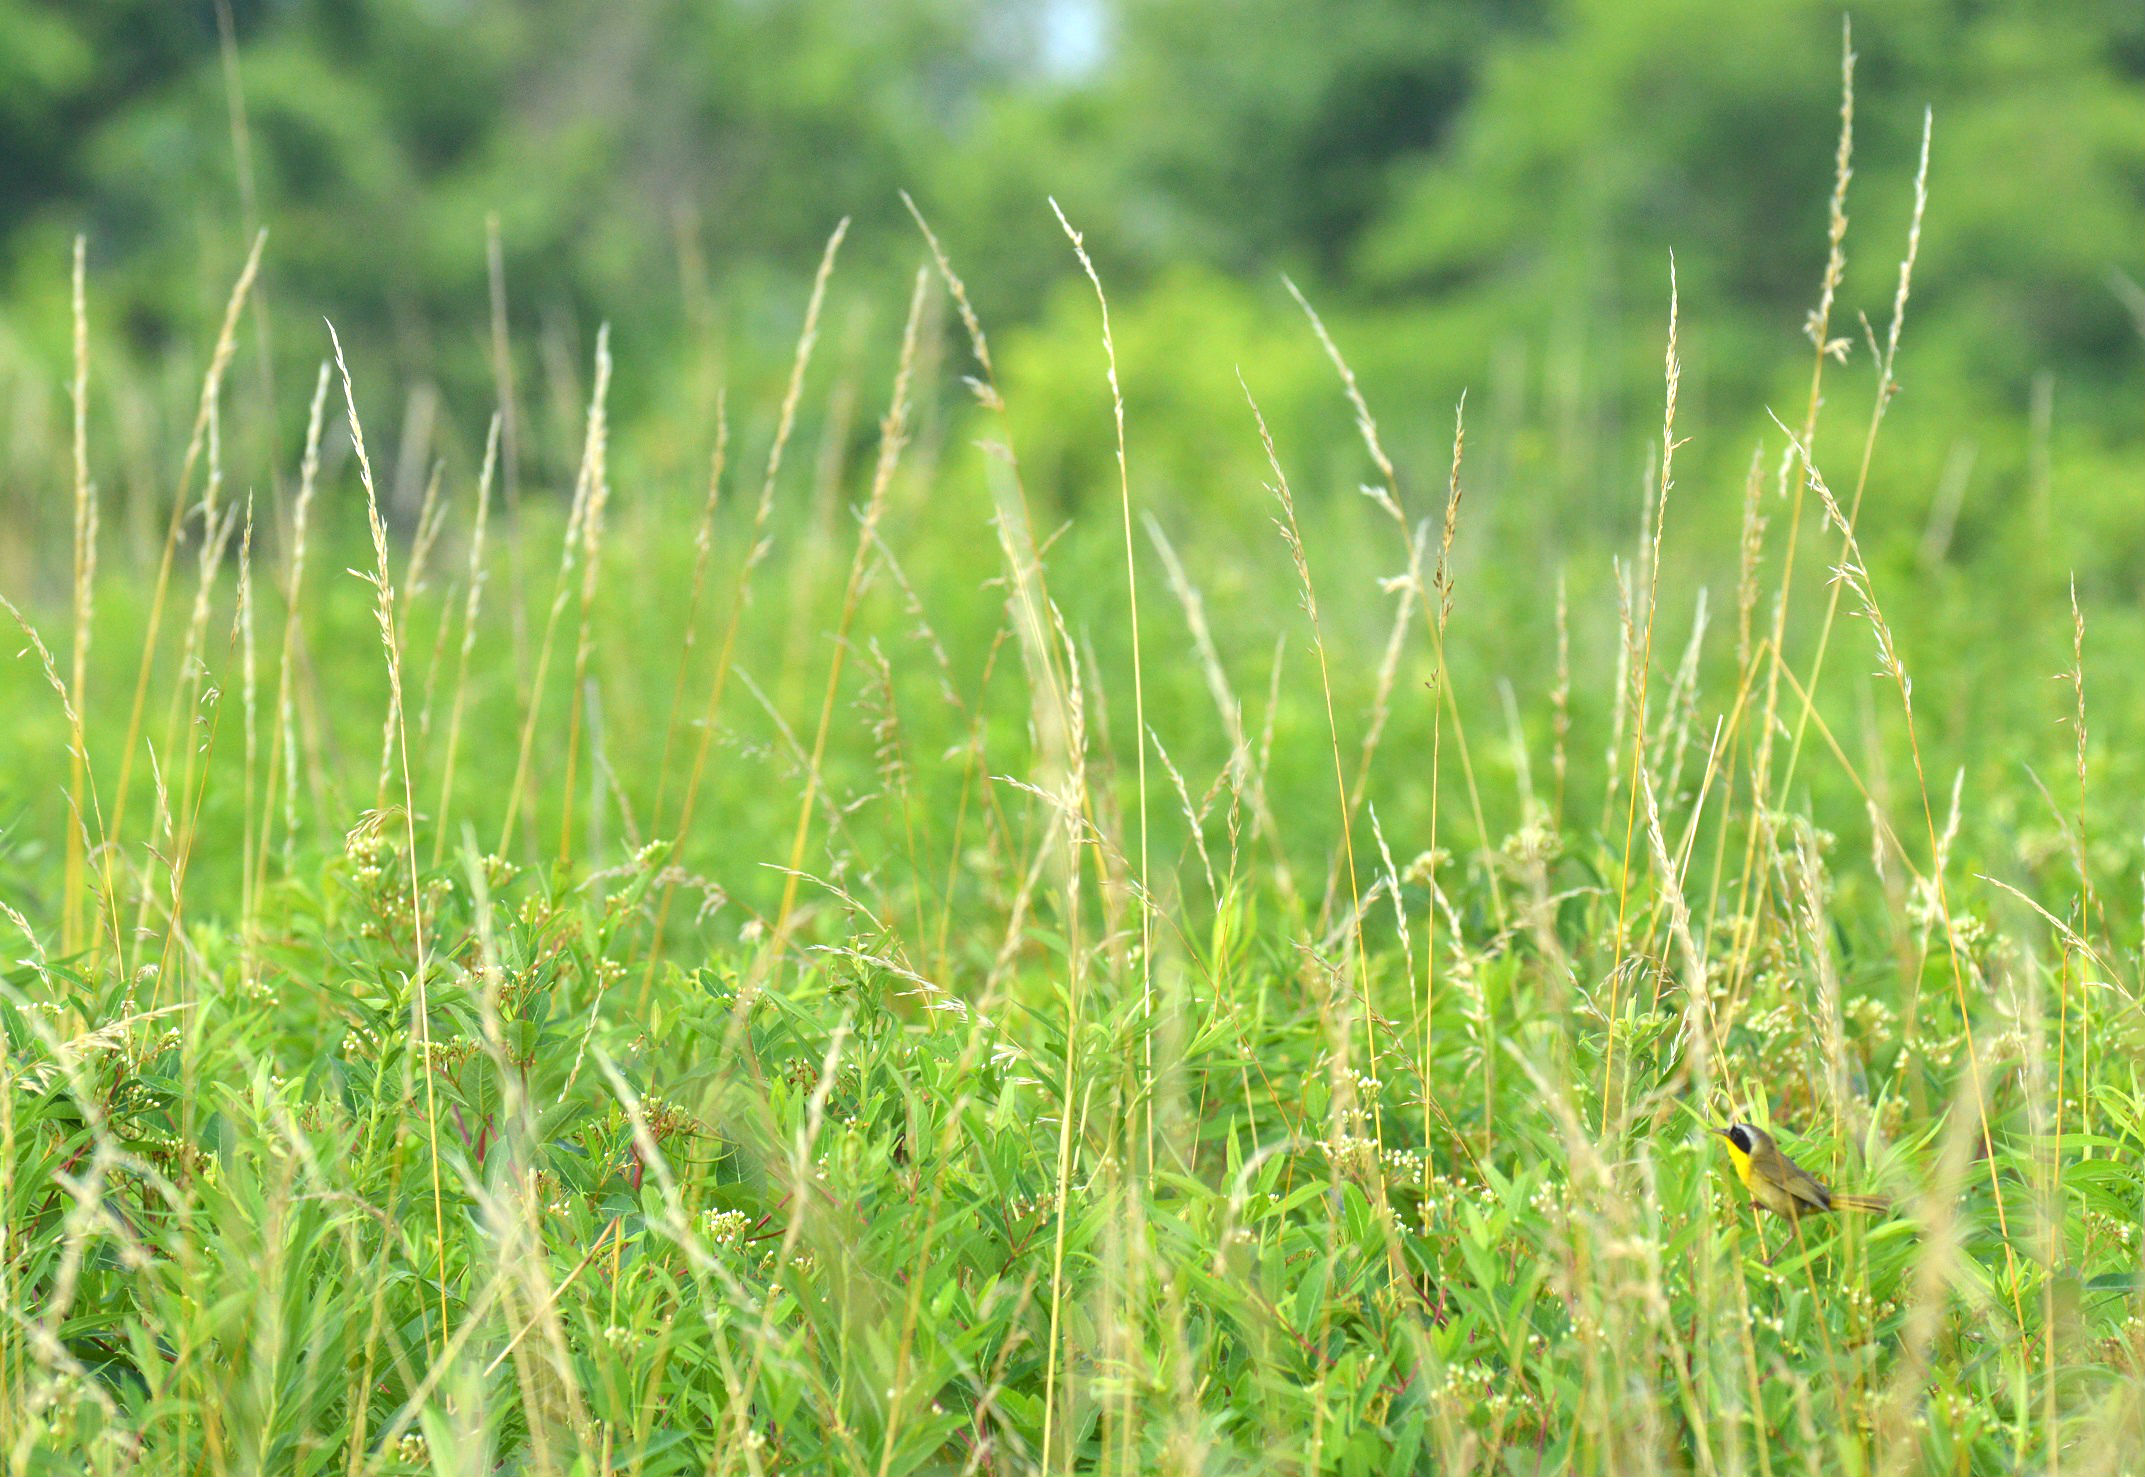
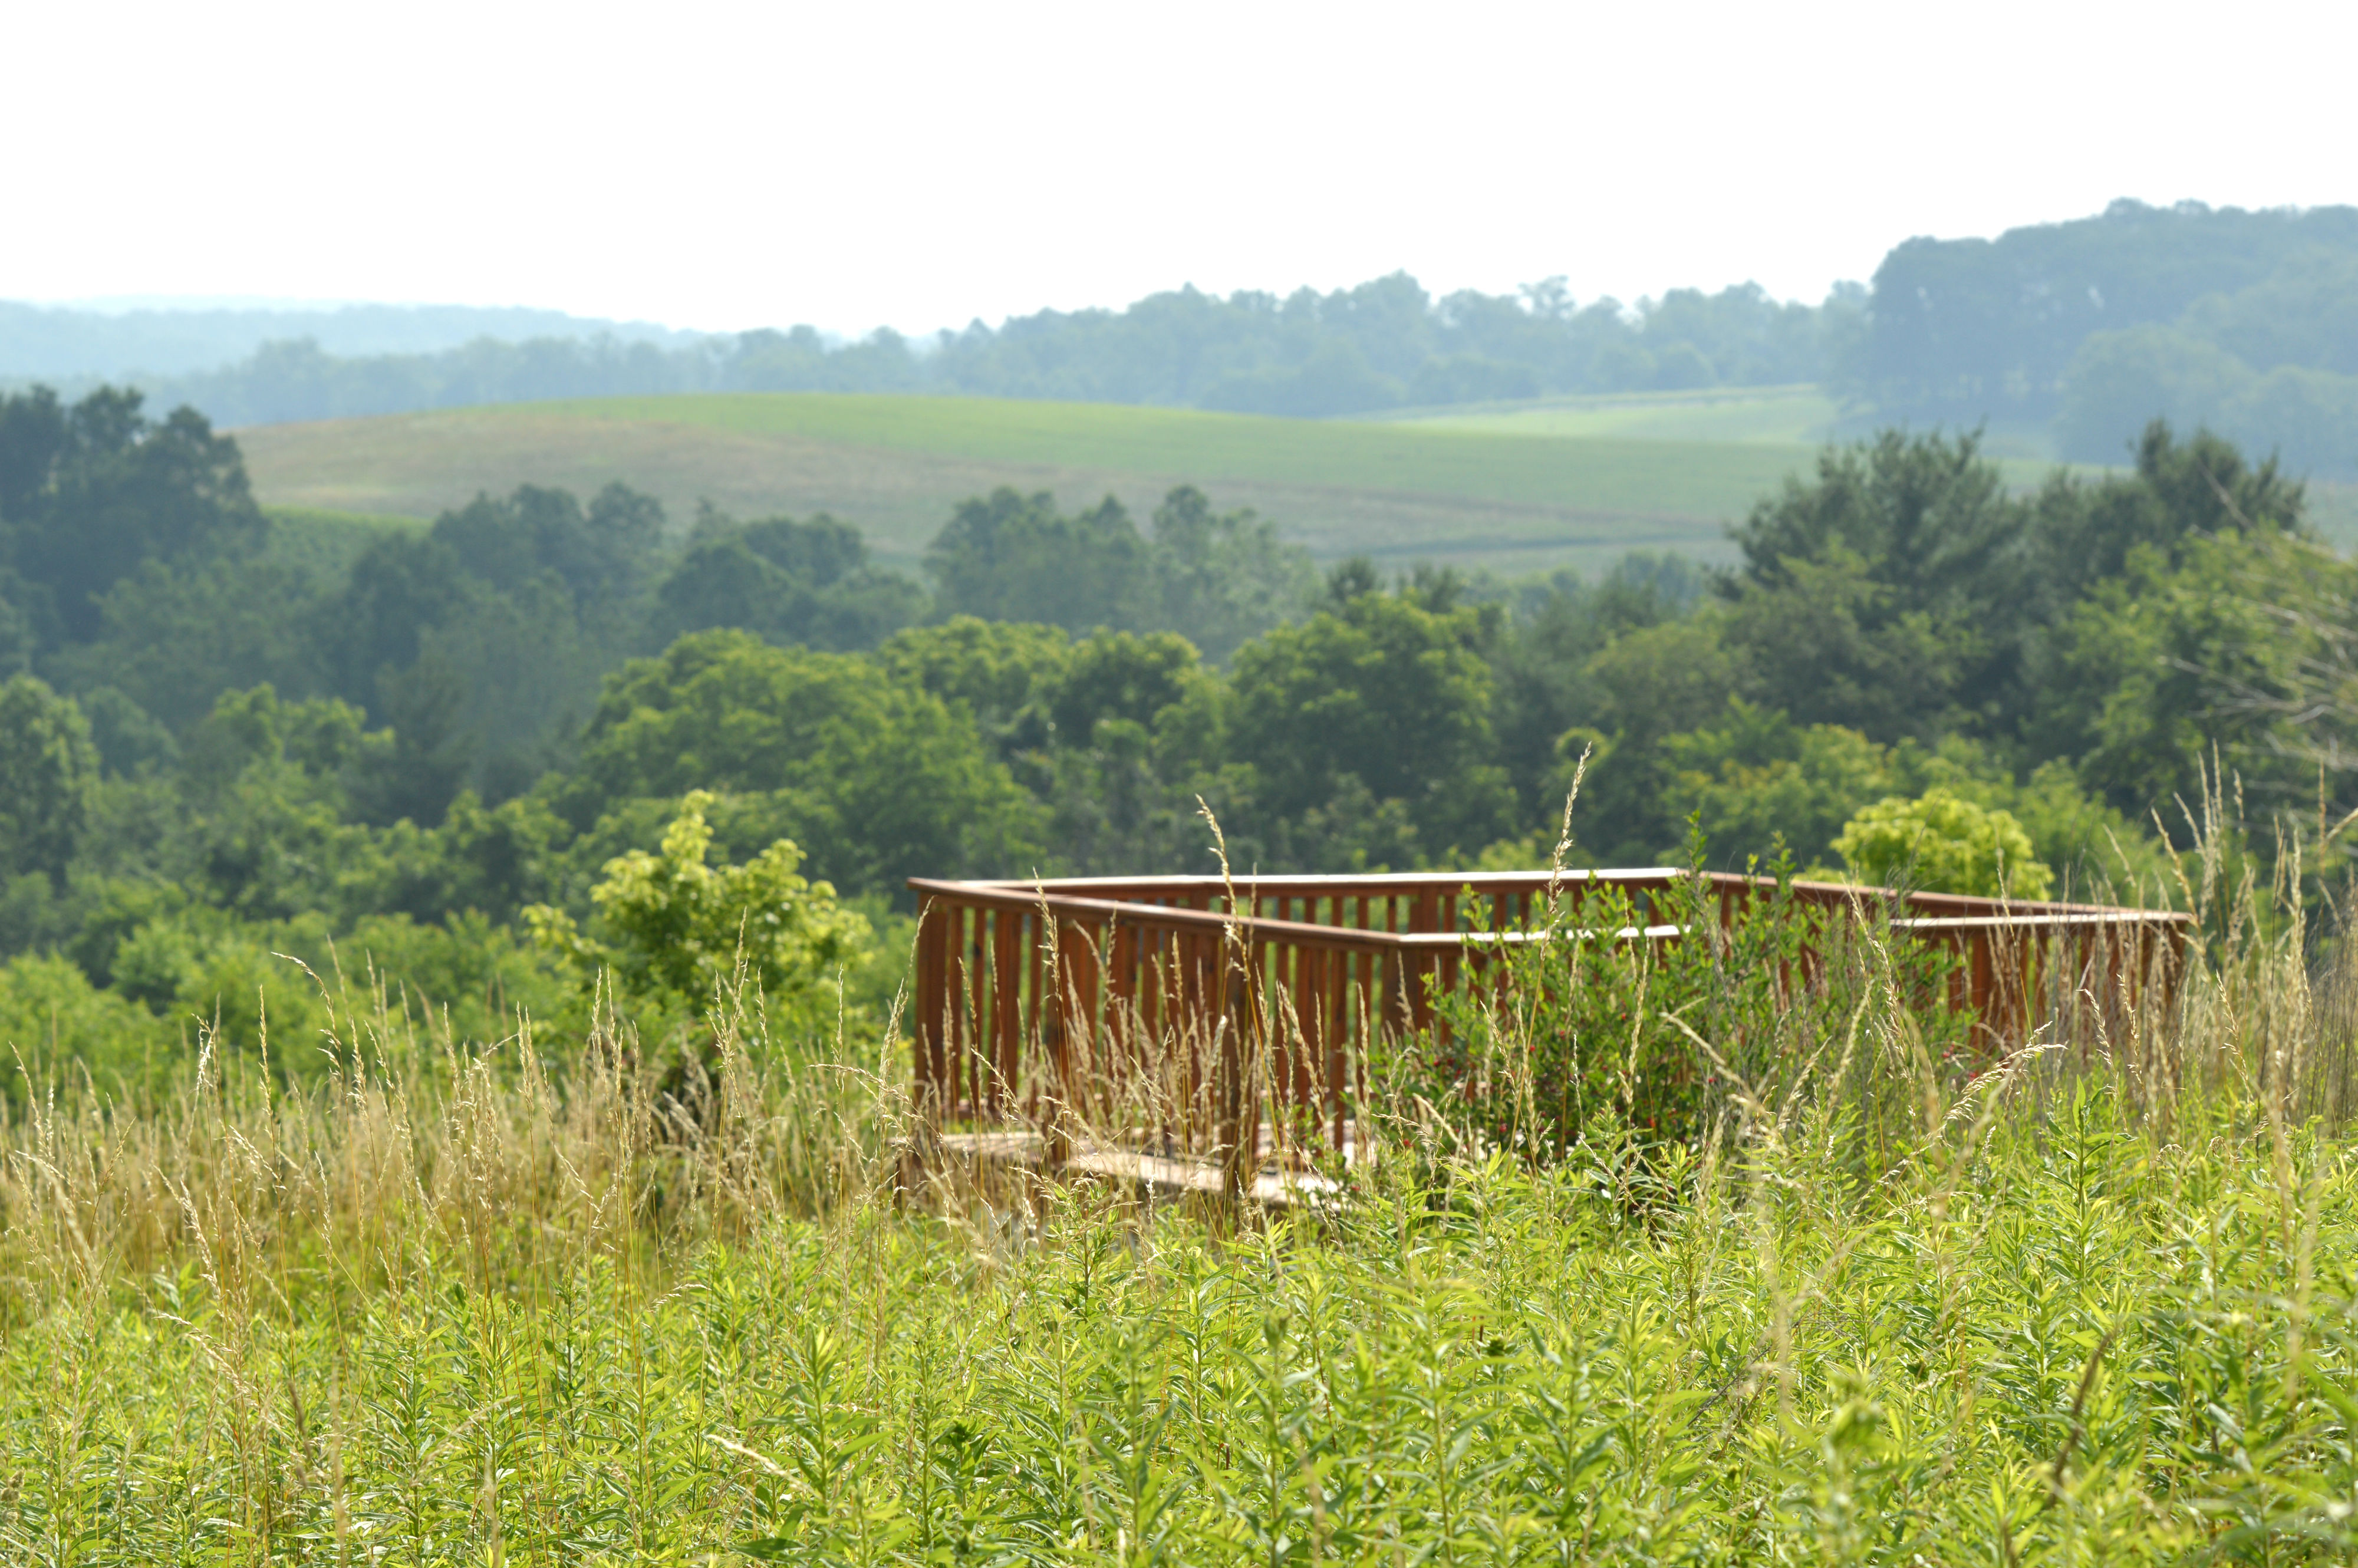
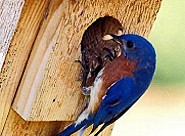
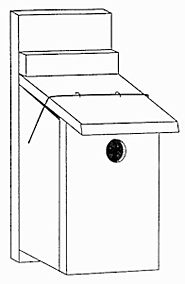

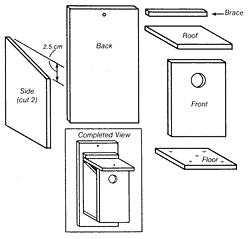 bit. This hole is the starting point of your jigsaw to cut the large hole
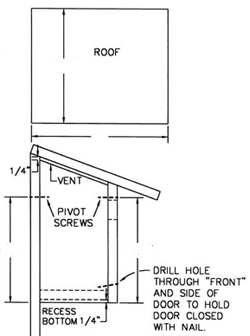 if the floors are recessed about 1/4 inch
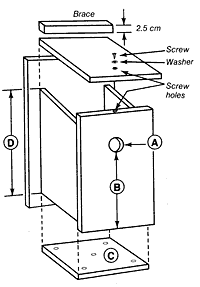 s aren’t likely to find it. Not everyone has the habitat for a wood duck, purple martin, or screech owl. On the other hand, just about anyone can attract a robin, titmouse, wren, or chickadee.