Stenciling Storm Drains
Interstate Commission on the Potomac River Basin
What are Storm Drain Markers?
 Storm drain markers or stencils are a way of labeling storm drain inlets with messages warning citizens not to dump polluting materials. They generally come in two types:
- Storm drain markers – these are manufactured markers that are glued to storm drains. They can be customized for your watershed with a message and graphics of your choice.
- Storm drain stencils – are either manufactured or hand-made templates for painting storm drains.
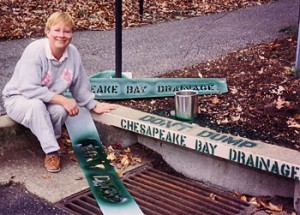
The stenciled messages–usually a simple phrase like “No Dumping! Protect Our Water”–remind would-be dumpers and passersby that the storm drains connect to local water bodies and that dumping pollutes those waters.
Why Should I Stencil Storm Drains
According to a Roper survey, many people still believe that industry is the greatest source of water pollution. The truth of the matter is that it is not only industry that is responsible for pollution—it is all of us! According to EPA, over 60% of our water pollution comes from urban and agricultural stormwater runoff (non-point source pollution).
Many people unknowingly believe storm drains connect to sewer treatment systems. But in most communities whatever enters the drains is discharged directly into a neighboring body of water without benefit of treatment. That is often a local lake, river or bay.
Storm drain stenciling benefits the Potomac’s waterways by making residents aware of the connection between our communities, our neighborhood streams and the Potomac River. It alerts others to the fate of stormwater runoff and the pollution carried with it from lawns and streets.
Stenciling won’t solve water pollution problems alone, but it’s a practical, positive, easy first step. Studies show that storm drain stenciling works to raise citizen awareness of storm drain connections to local lakes and rivers. In one study, more than 75 percent of the people who had seen the stenciled drains knew where their water went, compared to about a third of those who had not seen a stenciled drain.
Developing Your Goals and Budget
As with any project, your goals and budget for storm drain stenciling are closely related. A limited budget will certainly restrict what you are able to accomplish. The good news is that stenciling can be done very inexpensively, so you can accomplish a lot with a limited budget!
Goals
You may be targeting a single neighborhood where an illegal dumping problem has been identified, or you may be targeting a watershed that is home to pollution-sensitive species. You might instead be interested working with a specific group such as a girl or boy scout troop or some local businesses. Whatever the case, you will want to write out your specific goals and let them guide your work plan.
Some example goals:
- Reduce impacts of storm water runoff for a sub-watershed of your local stream;
- Enhance community awareness of storm water runoff and non-point source pollution;
- Foster environmental stewardship and an interest in science by students, teachers, administrators, and members of the community;
- Raising public awareness about the treasures and threats to their watershed
Keep in mind that your budget, goals, volunteers and your audience may affect whether you purchase pre-made markers or you use a stencil to paint the storm drains yourself. Stenciling the storm drains helps keeps costs down, however pre-made stencils last longer and some jurisdictions require their use. Additionally it may be too difficult for some volunteers to paint a stencil.
Budget
Cost
The cost associated with storm drain stenciling can be quite low if you plan on creating the stencil yourself. The costs will rise significantly if you plan on purchasing pre-made markers.
Here is a comparison between the costs associated with stenciling 100 storm drains and the costs associated with placing pre-made markers:
| Pre-made Markers | Stencil |
| Pre-made markers – $150-$450 (depending on size, quality, and if a custom message is added) Wire brushes (3) – $9.00 Door hangers – $25.00 Glue – $50.00 Hand cleaner (optional) – $5.00 Traffic safety vests (optional) – $10.00 eachTOTAL ESTIMATED COST (without optional items): $234-$534 |
Stencil – $5.00-$45.00 depending if you are creating your own or purchasing a pre-made stencil Paint – $40.00-$60.00 depending on if you are using spray paint, the paint quality, and if you are applying a background paint Paint brushes and stirrers – $0.00-$25.00 “WET PAINT” signs – $3.00 Masking tape – $5.00 Drop cloth – $12.00 Paint Remover $10.00 Wire brushes (3) – $9.00 Door hangers $25.00 Hand cleaner (optional) $5.00 Traffic safety vests (optional) – $10.00 eachTOTAL ESTIMATED COST (without optional items): $109-$194 |
Financing
Grants are available to pay for installing storm drain markers. You may also be able to defray costs by asking local businesses to donate materials. Furthermore, some localities and non-profit organizations (such as the Chesapeake Bay Foundation) provide stencils or markers free-of-charge to groups interested in installing them. Coordinate with your local Department of Public Works or Department of Environmental Protection.
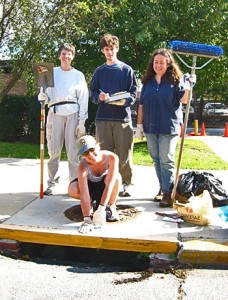
Steps for Developing a Storm Drain Stenciling Event
The act of storm drain stenciling/marking is relatively straightforward, however there is a lot of additional work that must take place before and after putting the markers into place.
- Determine appropriate location(s)
- Get permission in writing from local government
- Purchase needed supplies
- Advertise the storm drain stenciling event through as many outlets as possible
- Create and print instruction sheets for volunteers and informational door hangers for neighborhoods where markers will be placed
- Host storm drain stenciling/marking event
- Turn in information on locations of stenciled storm drains to local government
Materials
The materials you need depends on if you are installing storm drain markers or using a stencil to paint the storm drain
Stencil
- Stencil(s)
- Paint that meets local standards
- Paint brushes (3″) and stirrers (unless you are using spray paint)
- “WET PAINT” signs
- Masking tape
- Drop cloths
- Wire brushes
- Rags
- Traffic safety vests
- Pencil/paper/clipboard/Storm Drain Data Cards for recording observations and activities (see Resources below)
- For cleanup:
- Newspaper and rags
- Coffee cans and lids
- Mineral spirits or paint thinner
- Hand cleaner
Markers
- Storm drain markers
- Glue
- Wire brushes
- Traffic safety vests
- Pencil/paper/clipboard/Storm Drain Data Cards for recording observations and activities (see Resources below)
Organizing a Storm Drain Stenciling Event
The very first thing you need to do is identify the locations where you would like to stencil and GET PERMISSION!!! It’s CRUCIAL that you get written permission from your city public works office to stencil storm drains (or from business owners in private parking lots).
In advance of your event make sure that you have:
- Enough equipment to outfit your volunteer teams;
- Create copies of your written permission from the local government for each team of volunteers;
- Refreshments and snacks if possible or at least provide water;
- Created and printed a sign-in sheet;
- Created and printed enough directions for stenciling/marking storm drains (if possible with diagrams);
- Prepared a storm drain for demonstration purposes;
- Done as much prep work for each site as is possible—for example, put all the necessary equipment together for each team;
- Identified key volunteers and asked them to arrive early and be Team Leaders;
- Created and printed enough door hangers/outreach information for the houses/apartments in the community where the stenciling will take place;
- Created a press packet for any media that cover the event;
- Contacted local newspapers;
- Designated a volunteer to take photos of the event
The day of the event, break up into groups of three to five volunteers. No one should stencil storm drains by themselves! The team leader can assign tasks to each volunteer in the team—if possible, one painter, one scraper, two door hanger distributors, one data sheet person. Demonstrate to everyone how to stencil a storm drain using the following technique. You may also consider having your volunteers practice on cardboard.
Preparation
- Place drop cloth down in front of drain.
- Scrape the metal and/or cement using wire brushes to remove any rust or dirt.
- With a whisk broom sweep surface free of dirt.
- If using a background area, use tape and newspaper or the drop cloth to delineate a rectangular area on the face of the drain or the top of the drain (optional).
- Paint a rectangular area white to create a background for the message (optional).
Stenciling
- Experiment with how the stencil will best fit and look. Place the stencil on the area of the storm drain to be painted (if using a background paint, wait for it to dry before placing the stencil).
- One or two people should hold the stencil securely in place or tape the stencil in place with heavy tape. Be careful not to move the stencil once in place.
- If using spray paint or ink – shake can for one minute, hold spray can inverted about five inches from stencil. In a series of wide sweeping motions, spray one line at a time using a side to side motion until letters are uniformly covered. Do not spray too much – paint or ink will run under stencil making the words unreadable.
- If using a brush – stir contents well, brush over stencil being careful not to use too much paint or ink as it will run under stencil making the words unreadable.
- If using a roller – test that it is well inked by rolling on the pad and then testing on a newspaper. Do not put too much ink on the pad. A roller with too much ink will run making the words unreadable. It is best to roll over the stencil in a back and forth motion a number of times using a constant pressure until the words are legible.
- When finished carefully lift the stencil.
- Attach a “Wet Paint” Sign
Stenciling Support Work
- While part of the team is painting the stencil/another part of the team will go door to door to homes and businesses around the stenciled drain distributing door hangers that explain the work that being done and what the community members can do to reduce non-point source pollution.
- Team members that are helping with the painting should watch for traffic to ensure the team’s safety.
- After the stencil has been placed, one team member will fill out a storm drain data card to inform public works about the location and state of the storm drains that were stenciled.
Cleanup
- After the stencil is dry, remove the “wet paint” signs from each storm drain.
- Place newspapers and other non-hazardous wastes used in painting in a trash bag.
- Wrap brushes and cover leftover paint.
- Return to the central meeting place, turn in the equipment used and leftover supplies, and dispose of trash.
Follow up
Most storm drain markers have a lifetime of about ten years, however if you use a stencil, the paint will last approximately two years. Repaint as needed.
Resources
- Sample Liability Waiver
- Press Release
- Sponsor Letter
- Possible Stencil Locations
- Storm Drain Data Card
Additional Links and Counties/Cities that have Storm Drain Marking Programs
- MD DNR provides stencils for a small deposit.
- Clean Ocean Action offers stenciling kits that include door hangers.
- Make it fun, sing the Storm Drain Song while you work! (provided by the University of Minnesota Extension Service)
- Prince George’s County, MD
- Montgomery County, MD
- Loudoun County, VA
**Have you completed a project listed on W.A.T.E.R.? Send us a photo and we’ll feature your group in our Newsletter and Facebook page!**