Planting Trees from Containers or Ball and Burlap
Interstate Commission on the Potomac River Basin
What is a Ball and Burlap Tree Planting?
A ball and burlap tree is a tree that has been grown past a seedling size (greater than three feet in height) to a sapling (a tree with a trunk diameter at chest level of less than 5 inches) or tree size. At this point, the tree has reached a sufficient size so that it is planted with its roots and the surrounding ball of soil wrapped in burlap and reinforced with a rope or a wire basket. This is necessary to protect the fine roots that are easily damaged when exposed to air. A ball and burlap tree planting is simply a tree planting event using trees in this type of container. Ball and burlap tree plantings use different methods than the planting of seedlings directly into the soil.
Why Should I Plant Ball and Burlap Trees?
Trees provide many benefits to humans and the environment including producing cooling shade that reduces energy costs in the summer and providing breaks from the 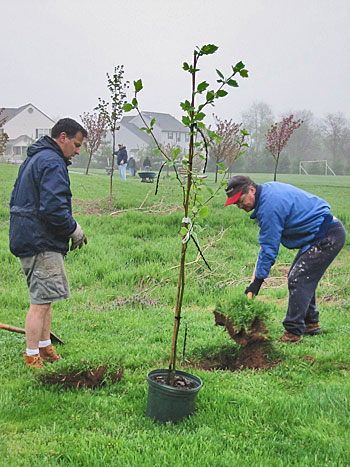 wind thereby reducing heating costs in the winter. Additionally trees have been shown to improve air quality, store carbon and reduce noise levels. Trees also produce some non-environmental benefits including increasing property values, increasing community pride, and benefiting human health.
The reason we have included tree planting in this toolkit, however is because of the benefits trees provide for watershed health. How to trees benefit watershed health? The answer is: in many ways! Planting trees can reduce soil erosion, runoff, flooding, and non-point source pollution (water pollution that cannot be traced to a single source – for example polluted runoff from roads). Trees also benefit watershed health by recharging ground water and sustaining steam flow.
Trees provide all of these services to our watershed because they are like mini-reservoirs. During a rainfall event they capture and store rainwater on their leaves and branches. By trapping rainfall, the water never leaves the site where it fell and therefore cannot become runoff that picks up pollutants and sediments and carries them to local streams. Additionally, the water that is captured by trees slowly percolates into the ground and recharges the groundwater that eventually will help augment stream flow during dry periods.
Developing Your Goals and Budget
Always consider your goals before developing your budget. It is better to dream big and come up with a well thought out project than to cobble together a plan based on the money that you have on hand. Having a great idea and a plan for implementation can help determine funding sources and can also help convince potential funders of the merit of your project. Once you have your project goals laid out, modify the project to fit the realities of your budget. Remember – because you considered the big picture you will always be able to go back and do more!
Goals
You may be planting street trees in an urban neighborhood to beautify the area while reducing water pollution, or you might be planting trees in your streams flood plain to help
stabilize the banks of the stream. You might be working on a school grounds in an effort to educate students or you might be helping homeowners create watershed-friendly landscapes on their property. Whatever the case, you will want to write out your specific goals and let them guide your work plan.
Some example goals:
- Reduce impacts of storm water runoff for a sub-watershed of your local stream
- Educate homeowners about the value of proper landscaping to reduce non-point source pollution
- Beautify a neglected park, school or neighborhood
- Reduce erosion and stabilize stream banks in an urbanizing stream
- Foster environmental stewardship and an interest in science by students, teachers, administrators, and members of the community
- Raising public awareness about the treasures and threats to their watershed
Cost
The cost associated with planting ball and burlap trees can be quite high – between $15.00 and $200.00 depending on the size and species of tree you are planting. The reason for the high cost is that these trees have been grown from seeds and have needed to be cared for over several years to reach planting size. If money is available, however, planting containerized trees is well worth the cost. These trees have reached a size where they are more likely to survive the hardships of being planted and the adversities of droughts, storms or floods. However, if you have a limited budget you may need to consider planting seedlings because they are significantly less expensive.
Financing
Many local governments have tree-planting programs and trees may be available free or for a reduced cost through them. They may also welcome a partnership to help plant trees and care for them once they are in the ground. You might also check with your local nurseries. They may be interested in helping defray the costs of your planting in return for some publicity or they may be able to give a discount for purchasing through them in bulk.
Two other ways of financing a tree planting project are to have individual purchasers or sponsors pay for trees or to seek out funding through grants and donations. Some tree planting projects are paid for through a combination of the two methods. Whichever method you choose will affect your work plan.
Timeline for a Tree Planting Event
The act of planting trees is relatively straightforward, however there is a lot of additional work that must take place before and after the trees are put into their place.
- Two months in advance – Determine appropriate location(s)
- Two months in advance – Get permission in writing from local government or landowner
- Two months in advance – Determine the appropriate trees and arrange for planted trees to be cared for after planting
- One month in advance – Secure source for trees and make arrangements for delivery
- One month to one week in advance – Advertise the tree planting event through as many outlets as possible
- Two to one week in advance – Call Miss Utility to determine if and where any utility lines are buried
- Several days before event – deliver flyers in the neighborhood announcing the project
- Several days before event – Purchase needed supplies
- Days before the event – Create and print instruction sheets for volunteers and informational door hangers for neighborhoods where trees will be placed
- Day before or day of the event – Deliver trees, materials and tools to the planting site
- Host tree planting event
- Post event – Maintain planted trees
Site Location, Preparation, and Tree Selection
Location
Determining the location of your tree planting first depends on the goals of your project. If your goal is to beautify a neighborhood, you may first want to target the areas that are in 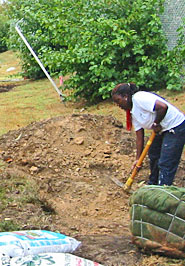 worst repair. If you are trying to stabilize a stream bank, you will want to choose a location where erosion is occurring but not one that is too unstable.
Once you have chosen the general location of your planting area, you should get to know that area better. Look at the geometry of the area so that you can design your planting to be aesthetically pleasing. Determine the size of the area so that you plant the proper number of trees. Look at the infrastructure of the site – are there overhead power lines? Are there fences or buildings? Are there trees already present? Look also at the light that the area receives, thinking not only of the light received at different times of the day, but also during different seasons. Look at the topography of the site, the soils, and how rainwater will move on the site. Are there steep slopes? Will the trees have to sit in water during heavy rains? Is the soil well-drained?
Site Preparation
Along with examining your site to determine its suitability for a planting you must also determine the site’s availability for planting. This requires three important steps:
- Securing landowner permission to plant on the site. It’s crucial that you get written permission from the local government if the site is a public area or from the landowner if the land is privately held. This will save you from liability issues if problems arise during or after the planting.
- Having Miss Utility locate and mark any underground utilities that may be in the planting area. This is a legal requirement and it is a free service. In most instances the site must be marked less than two weeks before the planting date to ensure that no changes have taken place.
- Determining who will care for the trees during the first two years after their planting. If you cannot find someone to take care of the plants, there is no sense in planting them. If necessary, the person or persons that will be maintaining the trees will need written permission to access the property where the plants have been placed.
Tree Selection
Once you have examined your site and determined its characteristics, you should use this information to guide your tree selection. Do you have space for a large shade tree? How does the tree fit with the surrounding landscape and other trees in the area? Is the tree going to be a focal point? Are species diversity, aesthetics or wildlife habitat important? Does the tree tolerate the climate, sun, topography, soil and water conditions of the site? Is the tree going to need to withstand urban stresses of heat, pollution and possible damage contact with human activities?
Advertising your Tree Planting Project
There are lots of ways to advertise for an event and, unfortunately, no one way works consistently. Here are several options for you to choose from. The best outreach campaigns make use of several techniques and only you can know what is best for your project. Advertising options include:
- Creating and distributing door hangers to target a specific neighborhood where you would like to work
- Creating and distributing a press release to your local paper, radio stations, television stations, and outdoor/environmental groups (see the Resources section for information on how to write and distribute a press release)
- Creating flyers and placing them in public libraries, recreation centers, and walking trails
- Add the event to social media
- Running an advertisement in a local paper, or on radio stations and/or television stations
- Discussing the event at a targeted community association, church group, youth group, and/or service organization meeting
- Advertising your event on free on-line environmental calendars such as the Chesapeake Network.
- Sending out an email to people you think would be interested and asking them to share the event with their friends
- Sending out a mass mailing to your targeted audience
Hosting a Tree Planting Event
In advance of your event make sure that you have:
- Enough equipment to outfit your volunteer teams
- Copies of your written permission from the local landowner
- Copies of the Miss Utility information and phone number
- Refreshments and snacks if possible or at least provide water
- Created and printed a sign-in sheet
- Created and printed enough directions for planting (with diagrams)
- Prepared a tree and hole for demonstration purposes
- Done as much prep work for each tree as is possible—for example, put all the necessary equipment together for each team or have the holes dug in advance by machine
- Identified key volunteers and asked them to arrive early and be Team Leaders
- Created and printed enough door hangers/outreach information for the houses/apartments in the community where the planting will take place
- Created a press packet for any media that cover the event
- Contacted local newspapers
- Designated a volunteer to take photos of the event
The day of the event, break up your volunteers into groups of three to five volunteers. No one should try to do a planting by themselves! The team leader can assign tasks to each volunteer in the team. Demonstrate to everyone how to plant a ball and burlap tree using the following technique:
Materials
Below is a list of materials that you may need for your planting event. The exact materials will depend on the number of trees that you are planting and the conditions of the soil at the planting site.
- Trees
- Wheel barrows
- Hand shovels
- Mattocks
- Iron rakes
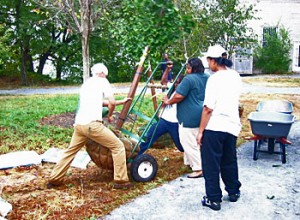
- Tree Dollies
- Wire cutters
- Stake Driver
- Stakes
- Rope
- Mulch
- Pruning tools
- Knife or tool to cut burlap
- Buckets or hose to water the trees
- Soil amendment
- Gloves
- First Aid Kit
- Hand cleaner
Preparation
- Place mulch, soil amendment and trees near the planting site
- Dig the hole for the tree – as a rule the width of the hole should be 2-3 times the width of the root ball and the depth should be 1-2 inches less than the height of the root ball
- Prune dead branches and crossing or low branches as necessary
- Place the dirt from the hole to one side
Planting
- Roll the tree into the hole and center and straighten it so that it stands perfectly upright. Try to handle
 the tree as low on the trunk as possible.
 - Mix at least one bag of soil amendment with the soil from the hole.
- Remove the top 2/3 of the wire basket or ropes and burlap. If using containers, remove them entirely. Leave enough of the material to hold the root ball in place.
- Shovel the newly-mixed soil back into place so that the tree is solidly in place, but DO NOT PACK DOWN THE SOIL. When placing the soil around the tree do not cover the trunk flare (the base of the tree trunk).
- If necessary, stake the trees on three sides. Drive the stakes around the edge of the area dug for the tree planting. The stakes should be upright – not leaning away from the tree. Tie ropes about chest height from the tree to the stakes. Tie the ropes on the tree through each other so that they are at the same height. Do not tie the ropes tightly to the tree but make a loop within which the tree can grow.
- Mulch around the tree covering the area with 2-3 inches of material. Do not cover the trunk flare. Make the mulch in the shape of a low sloped volcano so that water flows towards the trunk of the tree.
 the tree as low on the trunk as possible.
Post Planting
- Cleanup the materials from the site – placing trash in appropriate receptacles
- Use any leftover soil to fill in depressions around the site or have it removed from the site
- Water the tree until the root ball is saturated. A slow watering using a hose on a trickle or a tree bag is best.
- If possible, use a tree gator (a watering bag that goes around the tree) to slowly water the plant over many hours
Maintaining Your Trees
Newly planted trees need to be cared for an additional one to two years after planting. Twice a week the trees should be watered with 5 gallons of water poured slowly. This is especially important during periods of drought. The watering should continue until the ground is frozen. Begin watering again when the first leaves begin to appear. Don’t overwater the plant though – if the soil is wet to the touch, don’t water.
Source: TreeMendous Maryland
Resources
Additional Websites
- Arbor Day Foundation – They offer trees for sale and provide advice on which trees will grow well in your area
- Casey Tree Endowment – Urban Tree Selection Guide (large PDF)
- Maryland Recommended Tree List
- Washington, D.C. Urban Forestry
- Virginia Department of Forestry
- Maryland Forest Service
- West Virginia Division of Forestry
- Pennsylvania Bureau of Forestry
**Have you completed a project listed on W.A.T.E.R.? Send us a photo and we’ll feature your group in our Newsletter and Facebook page!**